
[1] It has been pointed out that no TROM exists for this destroyer, but her service was very similar in movements to her Desdiv 24 division-mates. Where this does not suffice the editor has invoked radio spot reports and the war diaries of other vessels that mention Yamakaze activity by name.
[2] One record says Yamakaze departed Balikpapan on 24 February and met Crudiv 5 and division-mate Kawakaze coming down from Staring Bay on this day. That for one reason or another Yamakaze either failed to sail from Balikpapan on 20 February or returned alone there on the 21st is not unreasonable. The result is however, pretty much the same.
[3] Though no TROM exists for Yamakaze Senshi-Sosho Vol.26, the Cruiser Division 5 Action Report, and message traffic shed considerable light on her battle activites from 27 February to 3 March 1942 as set forth in this revision.
[4] The Ashigara had fired eight torpedoes at 1300; but three of them had exploded prematurely and others might have. Pope also fired torpedoes in the closing stages of the action that is why this point is unclear.
[5] The Nautilus had actually already encountered the old destroyer Hakaze escorting Keiyo Maru (6,442 tons) and attacked them at 0345, but the torpedoes malfunctioned and the Keiyo Maru was only slightly damaged. Hakaze counter-attacked and dropped 11 depth-charges. It is unlcear if a warning was issued, but it appears likely. The attack position was bearing 96 degrees 61 nautical miles from Oshima, Izu Archipelago. This was was close to the path Yamakaze was taking later that morning. When Nautilus detected her it is significant that Yamakaze was pinging and making an estimated 12 knots. This is in fact a submarine-hunting mode (Japanese sonar did not work above 12 knots). It is likely the veteran Yamakaze was actively looking for the submarine that ironically sank her. Lt.Cdr. Hamanaka's ship had already sunk USS Shark in its career and if received a report about Keiyo Maru had probably diverted while in-bound to Tokyo Bay to make an anti-submarine sweep only for the hunter to become the hunted.
[6] On October 28th, 2009 Anthony Tully opened on J-Aircraft.com a discussion of apparent inconsistencies between the patrol report text and the famous photograph of the sinking Yamakaze. In the course of the next day the board had collectively arrived at a major discovery. Namely, that a second photograph (below) had been taken by Nautilus that showed more of the target usually cropped out and revealed nothing less than that Yamakaze's bow had broken off. The No.1 stack was left in a jumble and the afterpart of the destroyer clearly starting to go down by the forward. This photograph instantly made sense of the conflicting data and resolved the inconsistencies while giving a fuller glimpse into how Yamakaze sank.
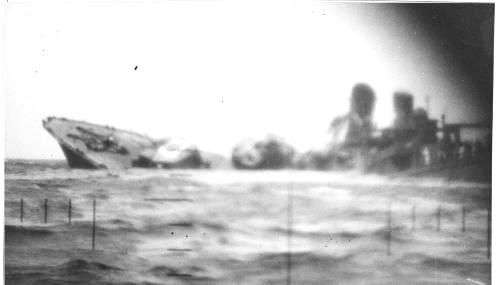
The picture can be seen here in the link below in high-resolution. The upending bow section that is usually all that is seen is on the left, and the two stack main body section of the destroyer partly in the frame on the right. It is worth noting the prominent hinomaru spread over No.1 turret was characteristic of vessels involved in the recent Midway and Aleutians Operations.
Yamakaze sinking picture No.2 NH-111752 (history.navy.mil)
In summary: Nautilus was at periscope depth when at 0831 heard pinging. Turning the scope to the bearing, sighted Yamakaze at 0835. As the submarine neared the destroyer was seen to have a white band on the funnel. Nineteen minutes later was close enough (range not given) to fire two torpedoes at track angle 120 degrees starboard set to a depth of twelve feet. Both hit Yamakaze at fifteen second intervals and clearly shattered the hull. The observation of the torpedo hits on Yamakaze recorded what happened during and just after the torpedo hits. At this time the destroyer appeared whole, nosing down by the bow with a list. But by the time the Nautilus raised its No.2 periscope to take a picture or two, the bow had broken at the foremast. This doesn't even seem to have been noticed at the time. This is what obtained when about 0858 the famous but misleading periscope photograph of Yamakaze's bow reared up and sinking under the waves was taken. At this time Yamakaze was in two - maybe three- pieces and the forepart was going down fast taking down skipper Hamanaka Shuichi and most of the bridge crew with it. A few were photographed escaping from the bridge. Though on other occassions a severed after section of a Japanese destroyer remained afloat, apparently the damage to reserve bouyancy was too great. The remaining section apparently foundered within five minutes and its depth charges and boilers exploded at 0905 as it went under. Nautilus surfaced 25 minutes later but nothing was in sight.
[7] COM 14 Memo of 6 Nov. 42 - DI of IJN intercepts. At the time the sinking of the Yamakaze and this photograph was something of a sensation. Released quickly, it was in some ways the U.S. submariner's big moment in the press in the early phase of the war to complement the symbol of the Japanese cruiser Mikuma smoldering from air attack off Midway. As the Intel decoding reveals, the Japanese ironically found it to be needed confirmation of the date and place of Yamakaze's fate. Unfortunately for the Japanese, the speculation some prisoners were taken had not occurred: Nautilus had not seen anything when it did surface.