|
|
Having located the Japanese force first, the Americans launched a steady progression of both land- and carrier-based attacks on the morning of the 4th. The penultimate strikes, by American carrier-based torpedo planes, were a dismal failure and led to the near-total annihilation of the US forces involved. However, they did succeed in drawing the Japanese fighters down to lower altitude, leaving the door open for a high-altitude dive bombing attack. And fortunately for the Americans, their dive-bombers, though poorly directed and low on fuel, managed to follow an outlying Japanese destroyer back to the main force. It was 1000 hours.
The subsequent dive-bombing attack was one of the most effective of the war. Three Japanese carriers (Akagi, Kaga, and Soryu) were heavily hit and would later sink, despite strenuous damage control efforts. Hiryu, which avoided the morning bloodbath, managed to launch an afternoon attack which crippled the hard-hit Yorktown (she would be sunk soon thereafter by a Japanese submarine), but then she, too, was found and sunk later in the day. Kido Butai, the feared Japanese carrier striking force which had ranged across the Pacific and beaten its foes with near-impunity, had been destroyed at a stroke.
For the Japanese Navy, this marked the end of any real strategic offensive capability. They would rebuild their air wings, and eventually replace their carriers, but they would never again possess a 'critical mass' of both large carriers and well-trained air groups. From now on, the war would be fought against the backdrop of an inexorable increase in US naval might, which might not be immediately deployable, but was demonstrably building. The Japanese, meanwhile, would find their strength increasingly on the wane. And the anvil of the Solomons, where the logistical and material backbone of Nihon Kaigun would be permanently and irrevocably broken, lay just ahead.
| Battle of Midway | Japan | Allied |
|---|---|---|
| Starting Forces |
First Mobile Force (Nagumo) x4 x4 x2 x2 x2 x2 x1 x1 x12 x12Main Body (Yamamoto)  x1 x3 x1 x9 x1 x3 x1 x9Strike Force (Kondo) x1 x2 x4 x1 x8Escort Force (Tanaka) x1 x10Occupation Support Force (Kurita) x4 x3 |
 x3 x3 x7 x7 x1 x1 x17 x17
|
| Losses |
x4 sunk (Akagi, Kaga, Hiryu, Soryu) x1 sunk (Mikuma) x1 heavily damaged (Mogami) |
x1 sunk (Yorktown) x1 sunk (Hammann)
|
Links From Related Partner Sites
WW2DB article on Battle of Midway and the Aleutian Islands
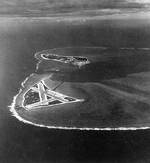 | 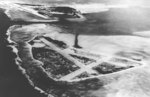 | 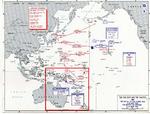 | 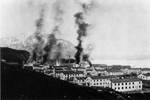 | 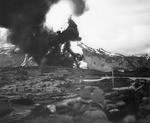 |
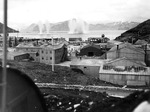
| Aerial photograph of Midway Atoll, 24 Nov 1941 | Aerial view of the Midway Islands and the Naval Air Station, Jun 1942 (later renamed Henderson Field). Interestingly, the air station is two different runway complexes on two different islands, but it still considered one air station. | Map depicting the Battle of Coral Sea and the Battle of Midway in May-Jun 1942 | Buildings in Dutch Harbor in flames after Japanese strike, 3 Jun 1942 | Explosion at Dutch Harbor, US Territory of Alaska, Jun 1942 |
 | 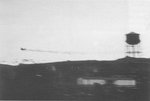 |  | 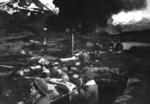 | 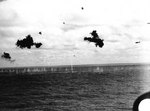 |
| Japanese bomb exploding in the water at Dutch Harbor, US Territory of Alaska, 3 Jun 1942 | Japanese Navy Flight Petty Officer Tadayoshi Koga's A6M Zero fighter damaged by anti-aircraft fire over Dutch Harbor, US Territory of Alaska, 3 Jun 1942, photo 1 of 2 | Japanese Navy Flight Petty Officer Tadayoshi Koga's A6M Zero fighter damaged by anti-aircraft fire over Dutch Harbor, US Territory of Alaska, 3 Jun 1942, photo 2 of 2 | US Marines in a trench at Dutch Harbor, US Territory of Alaska, 3 Jun 1942; note burning fuel tanks in background | A B5N torpedo bomber approached Yorktown, 4 un 1942 |
See all photos of Battle of Midway and the Aleutian Islands on WW2DB

