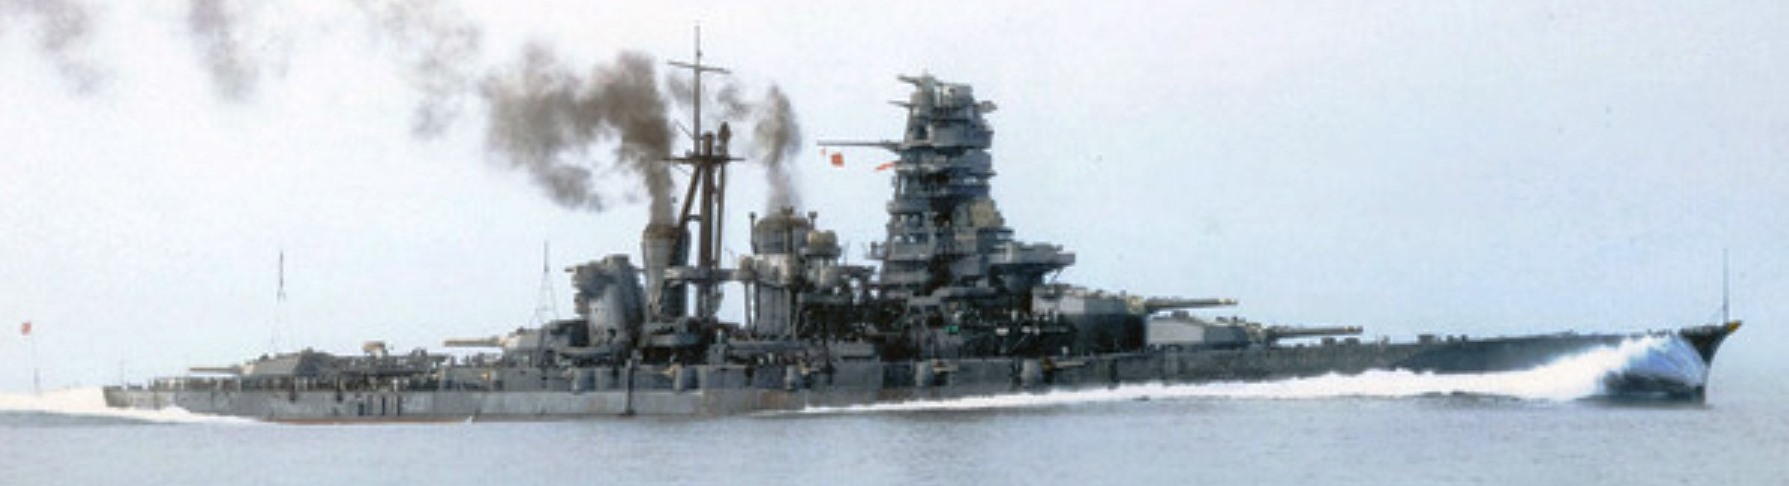
IJN Battleship KONGO:
Tabular Record of
Movement
© 1996-2016 Bob Hackett, Sander Kingsepp and Lars Ahlberg
Revision
22
29 November 1941:
BatDiv 3's section 2, KONGO and
HARUNA, is attached to Vice Admiral Kondo Nobutake's (former CO of KONGO) Second
Fleet, Southern (Malay) Force's Main Body: BatDiv 3/2, CruDiv 4's ATAGO, TAKAO,
MAYA and eight destroyers. The Main Body departs Saeki for Mako,
Pescadores.
2 December 1941:
The Main Body arrives at Mako. The
Main Body receives the signal "Niitakayama nobore (Climb Mt. Niitaka) 1208" from
the Combined Fleet. This signifies that hostilities will commence on 8 December
(Japan time).*
4 December 1941:
The Main Body departs Mako for the
South China Sea to provide distant support for the invasion forces.
8 December 1941: The Invasions of Malaya and the
Philippines:
Cruiser MAYA detaches from the Main Body to support the landings
at Appari and Vigan in the Philippines.
9 December 1941: The Pursuit of the Royal
Navy's "Force Z":
The Main Body is southeast of Indochina near Poulo
Condore Island. At 1415, LtCdr Harada Tamae's submarine I-65 reports
sighting a British force steaming NNW at 14 knots. This is Admiral Sir Tom S. V.
Phillips who sorties from Singapore to find and attack the Malaya invasion
transports with his Force Z: Captain J. C. Leach's new battleship HMS PRINCE OF
WALES, Captain (later Vice Admiral) W. G. Tennant's old battlecruiser HMS
REPULSE, destroyers HMS ELECTRA, EXPRESS, TENEDOS and Australian destroyer HMAS
VAMPIRE. The Main Body sorties south for a night attack against Force Z, but no
contact is made.
10 December 1941:
At dawn, Rear Admiral (later Vice
Admiral) Kurita Takeo's (former CO of KONGO) CruDiv 7's KUMANO, MOGAMI, MIKUMA
and SUZUYA with DesRon 3's light cruiser SENDAI and four destroyers join the
Main Body. Kondo also orders Vice Admiral Ozawa Jisaburo (former CO of HARUNA)
to join in the hunt with cruiser CHOKAI.
In the afternoon, the Main Body and all other ships depart the search area after receiving reports that both British capital ships were sunk off Kuantan, Malaya. Force Z was overwhelmed by 88 torpedo-bombers (Type 96 Mitsubishi G3M "Nells" and Type 1 G4M "Bettys") of the Genzan, Kanoya and Mihoro Kokutais of 22nd Air Flotilla based at Saigon and Thudaumot in French Indochina. 840 British seamen are lost including Admiral Phillips.
11 December 1941:
The Main Body arrives at Camranh Bay,
Indochina.
14 December 1941:
The Main Body departs Camranh to
cover the Second Malaya Convoy, northeast of Natuna Besar Island.
17 December 1941:
The Main Body returns to
Camranh.
20 December 1941:
The Main Body departs Camranh to
cover the invasion landings at Lingayen Gulf, Philippines.
21-23 December 1941:
The Main Body lies off the coast
of Luzon in the vicinity of Macclesfield Bank.
24 December 1941:
The Main Body returns to
Camranh.
8 January 1942:
The Main Body departs Camranh for
Mako.
11 January 1942:
The Main Body arrives at
Mako.
14 January 1942:
The Main Body departs Mako for the
Palau Islands in the Carolines.
18 January 1942:
The Main Body arrives at Palau.
Provides distant cover for the Dutch East Indies invasion forces.
21-25 January 1942:
The Main Body splits into two
groups to provide distant support of air attacks on Ambon Island. KONGO, CruDiv
4's ATAGO and TAKAO and four destroyers operate S of Palau while HARUNA, CruDiv
4's MAYA and four destroyers operate out of Palau to the east of Mindanao.
18 February 1942:
Bat Div 3 departs Palau for Staring
(Teluk) Bay, near Kendari, Celebes (now Sulwasei).
21 February 1942:
BatDiv 3 arrives at Staring Bay. Vice
Admiral (later Admiral) Kondo Nobutake (former CO of KONGO) CruDiv 4's ATAGO,
MAYA and TAKAO and six destroyers also arrive and refuel. Vice Admiral (Admiral,
posthumously) Nagumo Chuichi's (former CO of YAMASHIRO) First Air Fleet Striking
Force ("Kido Butai") CarDiv 1's AKAGI and KAGA, CarDiv 2's HIRYU and SORYU and
CruDiv 8's CHIKUMA and TONE, DesRon 1's light cruiser ABUKUMA with DesDiv 17's
URAKAZE, ISOKAZE, TANIKAZE and HAMAKAZE and DesDiv 18's KASUMI, SHIRANUHI and
ARIAKE arrives from their stike on Darwin, Australia and refuels.
25 February 1942: Operation "J" -The Invasion of the
Netherlands East Indies:
Vice Admiral Kondo, the overall invasion fleet
commander, detaches BatDiv 3/2's KONGO and HARUNA, CruDiv 4's ATAGO and TAKAO
and destroyers ARASHI and NOWAKI from the Main Body. Kondo's force departs
Staring Bay to hunt for shipping escaping from Java. They are joined later by
DesDiv 15's HAYASHIO from Timor.
7 March 1942:
BatDiv 3/2 bombards Christmas Island
(190 miles south of Java) with DesDiv 17's URAKAZE, HAMAKAZE, ISOKAZE and
TANIKAZE.
9 March 1942:
After the surrender of the Dutch East
Indies, BatDiv 3/2 returns to Staring Bay. During their sortie, Kondo's force
sinks eight British, Dutch and American ships.
10-25 March 1942:
Staring Bay. BatDiv 3's HARUNA, HIEI,
KONGO and KIRISHIMA refuel. Although on standby alert, after more than three
months of continuous operations, the crews are allowed some rest and relaxation.
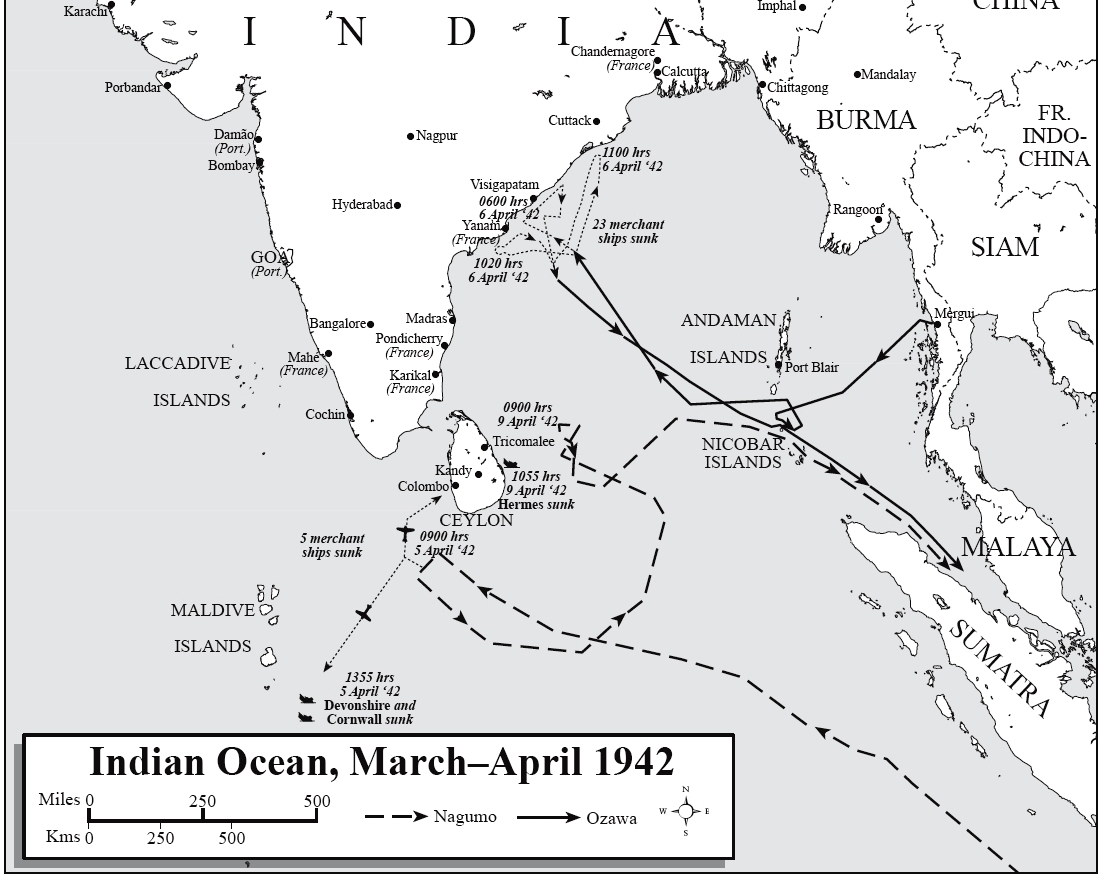
6 April 1942:
Bay of Bengal. At about 0600, the three ships of Ozawa’s
Northern Group attack and sink the 5,381-ton Norwegian tanker ELSA. After 0730,
KUMANO and SUZUYA and destroyer SHIRAKUMO attack a six-ship convoy and sink
4,986-ton American Export Line’s EXMOOR (ex-CITY OF ST. JOSEPH), 9,066-ton
British freighter MALDA, 7,718-ton British freighter AUTOCLYCUS and 2,441-ton
British freighter SHINKUANG at 19N, 86E. Ozawa's cruisers also sink 6,622-ton
British freighter INDORA and Captain J. H. Gregory’s British India Line’s
4,921-ton cargo ship SILKSWORTH. About 50 of SILKSWORTH's mostly Chinese crewmen
survive.
13 April 1942:
By nightfall, the fleet passes Singapore and enters the
South China Sea, bound for Japan.
15 April 1942:
Oiler KOKUYO MARU refuels KONGO with 1,045 metric tons of
fuel oil.
15 May 1942:
Reassigned from the Carrier Striking Force
to the Second Fleet, Strike Force, Occupation Force.
21 May 1942:
Departs Sasebo for
Hashirajima.
27 May 1942: Operation "MI" - The Battle
of Midway:
Bat Div 3, section 1's KONGO and HIEI depart
Hashirajima in the Second Fleet's Strike Force, Support Force, Main Body: CruDiv
4's ATAGO and CHOKAI, CruDiv 5's MYOKO and HAGURO, DesRon 4's light cruiser YURA
and seven destroyers.
6 June 1942: Operation "AL" - The Invasion of the
Aleutians:
At 2330, Yamamoto orders Bat Div 3/1, CruDiv 8's TONE and
CHIKUMA, light carrier ZUIHO, seaplane tender KAMIKAWA MARU, DesDiv 4's ARASHI,
NOWAKI, HAGIKAZE and MAIKAZE, DesDiv 10's MAKIGUMO, KAZAGUMO and YUGUMO, SubRon
2 and SubDiv 13 to detach from the Second Fleet and proceed northward to join
join Rear Admiral (later Vice Admiral) Kakuta Kakuji's (former CO of YAMASHIRO)
Second Mobile Force's carriers JUNYO and RYUJO later reinforced by ZUIKAKU. They
patrol 600 miles SW of Kiska in anticipation of an American counter-attack that
does not materialize.
9 June 1942:
Bat Div 3/1 is reassigned to Hosogaya's
Northern Force, Support Group.
24 June 1942:
Bat Div 3/1 arrives at Kawauchi, Mutsu
Bay.
28 June 1942:
Departs Sendai Bay.
10 July 1942:
Bat Div 3/1 is reassigned to the Second
Fleet.
11 July 1942:
Bat Div 3/1 arrives at Yokosuka. HIEI is
refit and drydocked.
14 July 1942:
Reassigned in Vice Admiral Kondo's Second
Fleet. KONGO becomes flagship of the resized BatDiv 3's KONGO and HARUNA. Vice
Admiral Kurita assumes command of the division. Vice Admiral Mikawa is
reassigned as the Commander of the new Eighth Fleet (Outer South Seas) activated
at Rabaul. HIEI and KIRISHIMA are reassigned to the new BatDiv 11.
18 July 1942:
KONGO departs Yokosuka. Her floatplane
complement is now one Aichi E13A Type 0 and two Mitsubishi F1M Type 0, tail
codes CI-x (in yellow).
19 July 1942:
Arrives at Hashirajima. Battle
training.
1 August 1942:
KONGO is transferred to Kure. Overhaul
and refit. A Type 21 air and surface detection radar set is installed on the
foretop rangefinder.
21 August 1942:
Returns to Hashirajima for battle
training and maneuvers.
6 September 1942:
Bat Div 3 departs Kure for Truk with
DesDiv 31's MAKINAMI and DesDiv 32's NAGANAMI.
8 September 1942:
Bat Div 3 is reassigned to the
Advanced Force, Vanguard Group.
10 September 1942:
Bat Div 3 arrives at Truk.
11 September 1942:
KONGO sorties with Vice Admiral
Kondo's Second Fleet, Advanced Force: BatDiv 3, CruDiv 4's ATAGO, TAKAO and
MAYA, CruDiv 5's HAGURO and MYOKO and DesRon 2. The Second Fleet accompanies
Vice Admiral Nagumo's Third Fleet: CarDiv 1's SHOKAKU, ZUIKAKU and ZUIHO, BatDiv
11's HIEI and KIRISHIMA, CruDiv 7's KUMANO and SUZUYA, CruDiv 8's CHIKUMA,
DesRon 10's light cruiser NAGARA and 11 destroyers to an area north of the
Solomon Islands.
14 September 1942:
KONGO is attacked by seven enemy
heavy bombers, but not damaged.
15-17 September 1942:
At sea. The fleet refuels its
destroyers.
18-20 September 1942:
The Second and Third Fleets
sortie towards the Solomons.
20 September 1942:
The fleets are ordered to return to
Truk.
23 September 1942:
The fleets arrive at Truk. Bat Div 3
provides distant support for operations in the Solomon
Islands.
5 October 1942:
Assigned to the Emergency Bombardment
Force.
11 October 1942:
Vice Admiral Kurita's Bat Div 3
departs Truk for Guadalcanal with the Second and Third Fleets.
12 October 1942:
Bat Div 3 detaches from Kondo and
Nagumo's fleets with Rear Admiral Tanaka Raizo's (former CO of KONGO) DesRon 2's
light cruiser ISUZU and three destroyers. Six destroyers from Shortland join
Kurita's force. All head towards the Solomon Islands.
13 October 1942:
Kurita launches recce floatplanes to
mark the target area with flares. Beginning at 0137, Kurita's force bombards
Henderson Field, at Lunga Point Guadalcanal. KONGO fires first followed shortly
thereafter by the HARUNA. KONGO and HARUNA pass by Lunga Point on an easterly
course with their main armament firing to starboard. Then they make a 180-degree
turn and come back, firing to port. Shore batteries fire on the battleships
which answer with their 6-inchers but the HARUNA and KONGO are far out of range
of the shore batteries.
KONGO fires 435 14-in. shells (104 Type 3, 331 Type 1) and twenty-seven 6-in shells. HARUNA fires 433 14-in. shells (189 Type 0, 294 Type 1) and twenty-one 6-in shells.
The 1,378-lb HE Type 3 "Sanshikidan" is used by KONGO for the first time in action. Only KONGO receives them before departure because there are not enough available for both battleships. Originally designed as anti-aircraft rounds, each time-fused shell contains 480 incendiary (rubber thermite) tubes and 192 steel stays. The older Type 0 is similar to the Type 3, but their 1,000 incendiary tubes are filled with a mix of rosin, magnesium, barium and sulphuric acid. Some 1,485-lb. Type 1 AP shells are also fired.
More than 40 U.S. aircraft are destroyed on the ground. Light cruiser ISUZU also fires on Marine batteries on Tulagi Island. Motor Torpedo Boat Squadron 3's PT-38, PT-46, PT-48 and PT-60 attack Kurita's destroyer screen, but destroyer NAGANAMI drives off the PTs and no hits are scored. At 0230, BatDiv 3 retires up the "Slot" at 29 knots.
14 Oct 1942:
Reassigned to the Advanced
Force.
17-18 October 1942:
BatDiv 3, DesDiv 15's KAGERO and
OYASHIO refuel at sea with Kondo's Advanced Force.
25 October 1942:
525 miles northwest of Espirtu Santo.
The Advanced Force is sighted by a B-17 of the 11th Bombardment Group (Heavy)
based at Espirtu Santo.
26 October 1942: The Battle of Santa
Cruz:
KONGO is attacked by four Grumman TBF "Avenger"
torpedo-bombers from USS ENTERPRISE (CV-6) but is not damaged.
30 October 1942:
BatDiv 3 returns to Truk.
1 November 1942:
Captain Koyanagi is promoted to Rear
Admiral.
9 November 1942:
Vice Admiral Kondo departs Truk for
Ontong Java area with his Main Body: CruDiv 4's ATAGO (FF) and TAKAO, Air
Striking Unit: carrier JUNYO, Screen: BatDiv 3's KONGO and HARUNA, CruDiv 8's
TONE, DesRon 3's light cruiser SENDAI, DesDiv 19's URANAMI, SHIKINAMI and
AYANAMI and DesDiv 11's HATSUYUKI and SHIRAYUKI.
15 November 1942:
The Second Naval Battle of
Guadalcanal:
After the loss of BatDiv 11's KIRISHIMA off Savo
Island, BatDiv 3 departs the area for Truk.
16 December 1942:
Truk. Captain (Vice Admiral,
posthumously), the Baron, Ijuin Matsuji (former CO of CA ATAGO and son of Fleet
Admiral Ijuin Goro, former CINC, Combined Fleet) assumes command. Rear Admiral
Koyanagi is reassigned as ComDesRon 2 at Rabaul.
24 December 1942:
Reassigned to the Third Fleet, BatDiv
3.
30 January 1943: Operation "KE" – The Evacuation of
Guadalcanal:
BatDiv 3 departs Truk with units of the Second and Third Fleet:
carriers ZUIKAKU, ZUIHO and JUNYO, CruDiv 4's ATAGO and TAKAO, CruDiv 5's HAGURO
and MYOKO, DesRon 4's light cruiser NAGARA, DesRon 10's light cruiser AGANO and
destroyers. The task force steams north of the Solomons as a feint to cover the
evacuation of Japanese forces from Guadalcanal by destroyers from Rabaul.
9 February 1943:
After the successful evacuation of
12,000 troops from Guadalcanal, the task force returns to
Truk.
15 February 1943: 20 February 1943: Arrives at
Sasebo. 27 February - 13 March 1943: 19 March 1943: 20 March 1943: 22 March 1943: 31 March 1943: 1 April 1943: 6 April 1943: 12 May 1943: American Forces Invade Attu, Aleutians:
17 May 1943: 20 May 1943: 22 May 1943: May 1943: June 1943: 16 June 1943: 17 June 1943: 21 June 1943: 17 July 1943: 9 August 1943: 18 September 1943: 25 September 1943: 17 October 1943: 19 October 1943: 23 October 1943: 26 October 1943: 5-6 November 1943: 11 December 1943: 16 December 1943: 30 January 1944: 27 February 1944: 29 February 1944: 1 March 1944: 2 March 1944: 3 March 1944: 6 March 1944: 7 March 1944: 8 March 1944: 11 March 1944: 14 March-11 May 1944: 31 March 1944: 1 April 1944: 2 April 1944: 1 May 1944: 5 May 1944: 7 May1944: 11 May 1944: 14 May-13 June 1944: 7 June 1944: 13 June 1944: Operation "A-GO" - The
Battle of the Philippine Sea: 14 June 1944: 15 June 1944: 17 June 1944: 18-19 June 1944: 20 June 1944: 22 June 1944: 23 June 1944: 24 June 1944: 29 June 1944: 30 June 1944: 8 July 1944: 10 July 1944: 12 July 1944: 14 July 1944: 17 July 1944: 19 July 1944: 20 July 1944: 20 July - 21 August 1944: 21 August 1944: 23 August 1944: September 1944: 18 October 1944: 22 October 1944: Operation "SHO-I-GO"(Victory) -
The Battle of Leyte Gulf: 23 October 1944: The Battle of the Palawan
Passage: 24 October 1944: The Battle of the Sibuyan
Sea: 25 October 1944: The Battle off
Samar: At 0544, Force A's lookouts spot four enemy destroyers,
and shortly thereafter three carriers, three cruisers and two more destroyers at
a range of 23 miles bearing 60 degrees to port. BatDiv 3 is ordered eastwards to prevent the enemy from
drawing away. HARUNA, her propellers not repaired after being damaged during the
Battle of the Philippine Sea, can make only 26 knots and soon lags
behind. At 0558 Force A opens fire at the "jeep" escort
carriers of "Taffy 3": USS ST. LO (CVE-63), WHITE PLAINS (CVE-66), KALININ BAY
(CVE-68), FANSHAW BAY (CVE-70) (F), KITKUN BAY (CVE-71) and the GAMBIER BAY
(CVE-73). Taffy 3's carriers are screened by destroyers USS HOEL (DD-533),
JOHNSTON (DD-557), HEERMANN (DD-532) and destroyer escorts USS JOHN C. BUTLER
(DE-339),DENNIS (DE-405), RAYMOND (DE-341),DENNIS (DE-405) and SAMUEL B. ROBERTS
(DE-413). At 0600, KONGO opens fire with her main 14-inch
armament at 15 miles. At 0622, KONGO is strafed repeatedly by F4F "Wildcats"
and the rangefinder for her main guns is disabled.
At 0625, KONGO is taken under fire by the destroyer
HOEL at 14,000 yards. In turn, HOEL is hit on the bridge by a 14-inch shell, but
launches five torpedoes at 9,000 yards. About this time, KONGO ceases fire with
her main armament because her turret rangefinders are situated too low for
long-distance engagement. KONGO switches over to her secondary
guns. At 0630, KONGO's lookouts spot four of HOEL's
torpedoes. KONGO turns hard to port to evade. All miss.
At 0654, destroyer HEERMANN fires three torpedoes at
HARUNA. These torpedoes miss HARUNA but cause YAMATO and NAGATO to turn
northward and steam for 10 miles until the torpedoes run out of fuel.
At 0655, KONGO spots GAMBIER BAY and scores numerous
hits. Between 0755 and 0910, Force A sinks the GAMBIER BAY,
HOEL, ROBERTS and JOHNSTON. By 0800, KONGO's main rangefinder is made functional
again. She takes destroyer escort ROBERTS, already hit by 8-inch cruiser shells,
under fire. ROBERTS is devastated by a salvo of KONGO's 14-inch shells and at
0912, the valiant little ship sinks. At 0813, two torpedo tracks are spotted, but avoided.
At 0825, Kurita orders all ships to head north, but at
1020 he reverses course southward and again heads towards Leyte
Gulf. Between 1030 and 1320, CHOKAI, CHIKUMA and SUZUYA are
disabled by battle damage and subsequently lost. Between 1228 and 1248, KONGO is attacked by about 20
SB2C "Helldiver" dive-bombers from Vice Admiral (later Admiral) John S. McCain's
(former CO of RANGER, CV-4) TF 38.1 The aircraft score five near-misses. One
near-miss to starboard amidships dents KONGO's torpedo bulge and side plating.
Sea water contaminates the fuel oil in the damaged tanks. At the stern, another
near-miss bends both starboard propellers' blades slightly. Twelve crewmen are
killed and 36 wounded in the attacks. Force A reverses course northward and at 2100 retires
through the San Bernardino Strait. During the day's action, KONGO expends 310 14-in rounds
(99 Type 3 and 211 Type 1), 347 6-in rounds (170 Type 0 and 177 Mark 4 as well
as 2,128 5-in and 50,230 25-mm AA rounds. 26 October 1944: At 1040, about thirty 13th Army Air Force Far Eastern
Air Force B-24 "Liberators" of the "Long Rangers" based at Morotai attack the
Force. At 1100, 60 aircraft from Task Groups 38.2 and 38.4 attack the Force.
Light cruiser NOSHIRO is sunk. KONGO is not further damaged.
27 October 1944: 28 October 1944: 6 November 1944: 8 November 1944: 11 November 1944: 15 November 1944: 16 November 1944: 20 November 1944: 21 November 1944: At 0146, three escorts become visible on radar at
20,000 yards. The seas and the wind's speed increase. At 0245, SEALION turns in
and slows for a surface attack. At 0256, Reich sets his Mark 18-1 electric
torpedoes' depth at 8 feet to hit any destroyer that may pass in front of his
target. From SEALION's bridge, KONGO's high pagoda superstructure is visible. At
3,000 yards, Reich fires his six bow tubes, then comes right full rudder to set
up his stern tubes. At 0300, after circling, SEALION stops and fires three
stern torpedoes at the third ship in the column ( NAGATO) at 3,100 yards. At
0301, SEALION sees three hits on the KONGO. YAMATO's crew reports seeing two
hits, flames and waterspouts. At 0304, SEALION observes a large explosion and
sudden flames on the second "battleship", but these may be the hit(s) that sink
destroyer URAKAZE (a veteran of the attack on Pearl Harbor) with all hands.
0307: Boiler rooms Nos. 6 and 8 flood, but KONGO is
able to make 16 knots. She eventually takes on a 15-degree list to port. SEALION
goes to flank speed and opens to westward. At 0330, the battleship group is
still making 16 knots on a straight course of 060 (T). At 0406, the battleship
group resumes zigzagging. Reich goes to maximum overload speed. SEALION makes 17
knots, but the seas and the winds increase. SEALION's engine rooms take on water
through her main induction valve. East China Sea. At 0450, the battleship group splits
into two formations. NAGATO, YAMATO and cruiser YAHAGI are in column with
destroyer YUKIKAZE ahead. KONGO, with destroyers HAMAKAZE and ISOKAZE, drops
astern and slows to 11 knots. Reich begins another attack on KONGO. At 0512,
SEALION slows and turns in to attack. KONGO further slows. At 0520, KONGO stops.
SEALION's radar indicates the target's pip is getting smaller. Range 17,000
yards. At 0524, an explosion, probably one of KONGO's magazines detonating,
illuminates the sky. The large pip on SEALION's radar shrinks and disappears.
Only the two destroyers' pips remain.
KONGO is the only IJN battleship sunk by a submarine
during the war and the last battleship ever sunk by a
submarine. 20 January 1945:
BatDiv 3 departs Truk for Japan in
company of the escort carriers JUNYO and CHUYO, seaplane tender NISSHIN and
heavy cruisers TONE and CHOKAI, escorted by six destroyers. After
encountering heavy seas JUNYO and two destroyers are ordered back to Truk.
Sasebo. Drydocked. After
the loss of both HIEI and KIRISHIMA, concrete protection is added in the
vicinity of the steering gear. The ventilation is also improved for the
machinery spaces and new watertight bulkheads and diesel-powered emergency fuel
oil pumps are installed. Six 25-mm AA guns (two triple mounts) are fitted in
place of six 6-in. guns secondary guns (Nos. 7 and 8) and the aft 4.5m
rangefinders.
Departs Sasebo for
Hashirajima.
Arrives at Hashirajima.
Reassigned to the Carrier Striking
Force, Support Group.
Reassigned directly to the Carrier
Striking Force, Main Body.
Bat Div 3 departs Kure for Truk with
DesDiv 4's HAGIKAZE. KONGO and HARUNA carry men of the Kure 7th Special Naval
Landing Force (SNLF).
BatDiv 3 arrives at Truk. Disembarks SNLF
troops.
BatDiv 3 at Truk.
Reassigned to the Attu Task Force. Bat Div
3's KONGO and HARUNA depart Truk for Yokosuka in response to the Attu invasion
with BatDiv 1's MUSASHI, CarDiv 2's HIYO, CruDiv 8's TONE and CHIKUMA and DesDiv
24's UMIKAZE and DesDiv 27's ARIAKE and SHIGURE, DesDiv 61's HATSUZUKI and
SUZUTSUKI. MUSASHI, with Admiral Koga aboard, also carries Admiral Yamamoto's
ashes to Tokyo for a state funeral.
Alerted by Ultras, USS SAWFISH (SS-276)
picks up the task force on radar but the submarine is unable to attack.
USS TRIGGER (SS-237) sights the task force
off Tokyo Bay, but the submarine is unable to attack. The task force arrives
safely. Carriers ZUIKAKU, SHOKAKU and ZUIHO and light cruisers AGANO and OYODO
join the task force at Yokosuka -Tokyo Bay. CruDiv 7's KUMANO, MOGAMI and SUZUYA
also arrive from Tokuyama. Before this powerful force can depart for a
counterattack against the Aleutians, Attu falls to U.S.
forces.
Departs Yokosuka with fleet on
maneuvers.
Refit at Yokosuka.
BatDiv 3 departs Yokosuka for Truk with a
task group: light carrier RYUHO, escort carriers UNYO and CHUYO, CruDiv 7's
KUMANO and SUZUYA and seven destroyers.
USS FLYING FISH (SS-229) sights the task
group making 20 knots, but the submarine is unable to attack.
USS SPEARFISH (SS-190) attacks one of the
carriers in the task group, but misses with four torpedoes. The task group
arrives safely at Truk.
Captain (later Rear Admiral) Shimazaki
Toshio (former CO of CL SENDAI) assumes command of KONGO. Captain Baron Ijuin,
promoted to Rear Admiral, is reassigned as ComDesRon 3, Second Fleet.
Vice Admiral Kurita assumes command of
the Second Fleet. Kondo, promoted to Admiral on 23 April 1943, is reassigned as
Commander-in-Chief of the China Area Fleet.
Truk. BatDiv 3 remains at Truk as
guardships with flagship MUSASHI and the FUSO during the fleet's sortie to Brown
Island, Eniwetok in response to raids on Tarawa, Makin and Abemama Atolls by
Rear Admiral Charles A. Pownall's Task Force 15.
The fleet returns to Truk.
The Japanese intercept radio traffic
that suggests the Americans are planning another raid on Wake Island. Admiral
Koga sorties from Truk to intercept the enemy carriers with the fleet: BatDiv
1's YAMATO, MUSASHI and NAGATO, BatDiv 2's FUSO, Bat Div 3's KONGO and HARUNA,
CarDiv 1's SHOKAKU, ZUIKAKU and ZUIHO, CruDiv 4's's ATAGO, TAKAO, MAYA and
CHOKAI, CruDiv 7's SUZUYA and MOGAMI, CruDiv 8's CHIKUMA and TONE and light
cruisers AGANO, NOSHIRO, OYODO and destroyers.
Arrives at Brown Island. Resumes
standby alert.
Sorties from Brown Island to an area
west of Wake Island. No contact is made with Task Force
14.
The fleet arrives back at
Truk.
Rear Admiral (later Vice Admiral)
Alfred E. Montgomery's (former CO of RANGER, CV-4) Task Force 14's carriers USS
ESSEX (CV-9), YORKTOWN (CV-10), LEXINGTON (CV-16), INDEPENDENCE (CV-22), BELLEAU
WOOD (CVL-24) and COWPENS (CVL-25) launch raids on Wake and the Marshall
Islands.
BatDiv 3 departs Truk for Sasebo with
DesDiv 4's MAIKAZE and NOWAKI.
Arrives at Sasebo.
Sasebo. Drydocked. Four 152mm guns
(Nos. 1, 2, 11, 12) and their directors and two 25mm twin mounts are removed.
Four 127-mm. AA guns (two twin mounts) and twelve 25mm (four triple mounts) are
installed in their place.
Undocked.
Departs Sasebo for sea trials;
returns the same day.
Departs Sasebo for the western
Inland Sea.
Reassigned to the Second Fleet, BatDiv
3. At Mutsure Bight; after a stop at Hesaki Bight arrives at Tokuyama. Refuels.
Departs Tokuyama for sea trials; stops
at Yashima Bight overnight.
Departs Yashima for main and secondary
gun trials; returns to Kure the same day.
Departs Kure for Lingga. Stops at
Tokuyama. Refuels.
Moves from Tokuyama to Sumoto Bight,
Awaji Island. Embarks troops.
BatDiv 3 departs Sumoto for Lingga (south
of Singapore) with carrier ZUIKAKU, cruiser MOGAMI, DesDiv 10's ASAGUMO, AKIGUMO
and KAZAGUMO. BatDiv 3 carries the 103rd Air Defense Unit (241 men in all).
At 1210, the task group is sighted by
USS LAPON (SS-260), but the submarine is unable to attack. ZUIKAKU and MOGAMI
are detached and put into Seletar Naval Base, Singapore. The remainder of the
task group continues south to Lingga.
Lingga. Disembarks troops, then
maneuvers at sea. Begins several months training with Vice Admiral Ozawa
Jisaburo's (former CO of HARUNA) Mobile Fleet. Ozawa's fleet units are refueled
by oil from the nearby supply at Palembang, Sumatra.
Departs Lingga for Singapore to take on
supplies.
KONGO completed loading fuel at
0900.
Departs Singapore for
Lingga.
Captain Shimazaki is promoted to Rear
Admiral.
Departs Lingga for
Singapore.
Departs Singapore for
Lingga.
Steams with Vice Admiral Ozawa Jisaburo's
(former CO of HARUNA) Mobile Fleet from Lingga to old U.S. anchorage at Tawi
Tawi.
Tawi Tawi. In Vice Admiral
Kurita's Force "C" Vanguard: BatDiv 1's YAMATO and MUSASHI, BatDiv 3, CarDiv 3's
CHITOSE, CHIYODA and ZUIHO, CruDiv 4's ATAGO, TAKAO, MAYA and CHOKAI, CruDiv 7's
KUMANO and SUZUYA, CruDiv 8's CHIKUMA and TONE, DesRon 2's light cruiser NOSHIRO
and six destroyers.
Bongao, Tawi Tawi. KONGO receives fresh provisions
replenishment from supply ship KITAKAMI MARU.
In Tokyo, the CINC, Combined
Fleet, Admiral Toyoda Soemu, (former CO of HYUGA), sends out a signal that
activates the A-GO plan for the Defense of the
Marianas.
Guimaras. Refuels from
oilers.
The Mobile Fleet departs Guimaras
through the Visayan Sea. At 1622, LtCdr Robert Risser's USS FLYING FISH (SS-229)
sights the Mobile Fleet in the San Bernardino Strait.
LtCdr (later Rear Admiral) Herman J.
Kossler's USS CAVALLA (SS-244) sights the Mobile Fleet in the Philippine Sea and
reports its movement after surfacing later that evening.
Ozawa splits the Mobile Fleet.
Forces "A" and "B" proceed southward. The Vanguard Force "C" proceeds due east
in the Philippine Sea headed towards Saipan. The Mobile Fleet's aircraft attack
the U.S. Task Force 58 off Saipan, but suffer overwhelming aircraft losses in
the "Great Mariana's Turkey Shoot".
At 1830, BatDiv 3 and carrier CHIYODA
are attacked by Curtiss SB2C "Helldiver" dive-bombers and Grumman TBM "Avenger"
torpedo-bombers from USS BUNKER HILL (CVL-17), MONTEREY (CVL-26) and CABOT
(CVL-28). Aircraft from the CABOT's VT-31 score hits on HARUNA, but KONGO
remains undamaged. During the battle, air attacks sink carrier HIYO and damage
the carriers ZUIKAKU, JUNYO, CHIYODA and RYUHO. Meanwhile, CAVALLA sinks carrier
SHOKAKU and ALBACORE (SS-218) sinks new armored carrier TAIHO. KONGO retires
with the Mobile Fleet to Okinawa.
Arrives at Nakagusuku Wan, Okinawa.
KONGO refuels destroyers.
Departs
Okinawa.
The Mobile Fleet arrives at
Hashirajima.
Departs Hashirajima for Kure.
Kure Naval Yard. A Type 22 surface
search/gunnery control radar set and Type 13 radars are fitted on the bridge and
the mainmast respectively. Seventy-six 25mm AA guns (twelve triple and forty
single mounts) are installed. KONGO's secondary and AA armament are eight
6-inch/50, six dual 5-inch/40 and one hundred 25-mm AA. She embarks two
Mitsubishi F1M2 "Pete" floatplanes.
Undocked.
KONGO is loaded with materials and embarks elements of the 36th Infantry
Regiment, 28th Division for transport to Okinawa.
Departs Kure for Okinawa with Group
B's NAGATO, cruiser MOGAMI, DesRon 10's light cruiser YAHAGI, destroyers.
Accompanied by Group A's BatDiv 1's YAMATO and MUSASHI, CruDiv 4's ATAGO, TAKAO,
MAYA and CHOKAI, CruDiv 7's KUMANO, SUZUYA, TONE and CHIKUMA, DesRon 2's light
cruiser NOSHIRO, destroyers. Carries troops, material to Nakagusuku Wan (Bay),
Okinawa.
Group A detaches from Group B and
departs Okinawa directly for Lingga (near Singapore) to join Mobile Fleet,
arriving 17 July.
KONGO with Group B departs Okinawa for
Manila.
Group B arrives at
Manila.
Departs Manila.
About midnight, an unknown submarine
attacks and fires four torpedoes, but they all miss. Group B arrives safely at
Singapore.
Departs Singapore for Lingga.
Training at Lingga.
Flagship of Vice Admiral Suzuki Yoshio's (former CO of KONGO, 1938) BatDiv 3.
HARUNA arrives from Sasebo and
rejoins the division.
KONGO departs Lingga for Seletar,
Naval Base, Singapore where electrical work is accomplished. Eighteen more 25
mm. AA are probably also added at this time to bring their final total to 118.
Returns to
Lingga.
Lingga anchorage. KONGO receives fresh provisions
replenishment from supply ship KITAKAMI MARU.
BatDiv 3 departs Lingga with fleet
for Brunei Bay, Borneo.
Arrives at Brunei.
KONGO sorties from Brunei as the flagship
of the Second Section of Force A of Vice Admiral Kurita's First Striking Force:
(Center Force): BatDiv 3, CruDiv 7's KUMANO, SUZUYA, TONE and CHIKUMA, DesRon
10's light cruiser YAHAGI and five destroyers. The Second Section sorties behind
Force A's First Section: BatDiv 1's YAMATO, MUSASHI and NAGATO, CruDiv 4's
ATAGO, TAKAO, MAYA and CHOKAI, CruDiv 5's MYOKO and HAGURO and DesRon 2's light
cruiser NOSHIRO and 10 destroyers.
Two American submarines attack Force A. DARTER (SS-227)
sinks Kurita's flagship, cruiser ATAGO. Destroyer KISHINAMI picks up Kurita. Ten
hours later, he transfers to YAMATO. DARTER also damages TAKAO. USS DACE
(SS-247) sinks MAYA. KONGO, in Force A's Second Section, is not damaged.
Force A endures raids by over 250 U.S. carrier aircraft.
MUSASHI, hit by numerous aircraft torpedoes and bombs, sinks in the Visayan Sea.
YAMATO, hit by bombs, is down by the bow. Force A continues on course through
the Sibuyan Sea. HARUNA is damaged by near misses. KONGO is not damaged. At 1530
hours, Force A reverses course back through the Sibuyan Sea. At 1715 hours,
Kurita again reverses course. At 2330 hours, Force A enters the San Bernadino
Strait in single file.
At 0030, Force A exits the San Bernardino Strait and proceeds
towards Leyte Gulf.
Tablas Strait off Panay. At 0800,
Force A is attacked by about 30 Grumman TBM "Avengers" from USS WASP (CV-19) and
COWPENS (CVL-25). At 0834, the Force is attacked by about 50 Curtiss SB2C and
TBM torpedo planes from HORNET (CV-12). Two bombs hit YAMATO.
No attacks.
The remnants ofForce
Aarrive at Brunei Bay, Borneo and refuel.
Carrier JUNYO and light cruiser
KISO, escorted by DesDiv 30's YUZUKI and UZUKI arrive at Brunei from Sasebo with
ammunition resupply for Kurita's force.
BatDiv 3 departs Brunei towards
Pratas Islands (near the Formosa Strait) with a task group: BatDiv 1's YAMATO
and NAGATO, BatDiv 3, light cruiser YAHAGI and DesDiv 17's four destroyers.
JUNYO, cruisers TONE and ASHIGARA, light cruiser KISO and DesDiv 30 follow.
JUNYO, TONE and KISO and DesDiv 30 detach to Manila. The remainder of the task
group makes a feint through the Balabac Strait, then returns to
Brunei.
At 1000, arrives at Brunei Bay.
Refuels from oiler HAKKO MARU.
NAGATO is reassigned to BatDiv 3
in Second Fleet with KONGO and HARUNA.
Brunei. Attacked by 40 USAAF
Consolidated B-24 "Liberator" bombers and 15 Lockheed P-38 "Lightning" fighters.
BatDiv 3 is not damaged. At 1830, KONGO departs for Kure with BatDiv 1's YAMATO,
BatDiv 3'sKONGO, NAGATO, light cruiser YAHAGI and DesDiv 17's HAMAKAZE, URAKAZE,
ISOKAZE and YUKIKAZE. DesDiv 43's KIRI and UME arrive from Spratly Island and
join the task group's escort. HARUNA detaches and remains at Brunei with cruiser
ASHIGARA and light cruiser OYODO.
The task group moves into the
Formosa Strait, passes the Pescadores, then ceases zigzagging.
Formosa Strait. At 0020, LtCdr
(later Vice Admiral) Eli Reich's USS SEALION II (SS-315) makes radar contact at
44,000 yards. The sky is overcast with 1,500 yards visibility and the sea is
calm. Reich begins an approach. He goes ahead flank on four engines. By 0043, he
has four radar contacts at 35,000 yards. Reich identifies the targets as two
battleships and two heavy cruisers. The targets are moving in column with the
"cruiser" (actually, KONGO) ahead followed by two battleships (NAGATO and
YAMATO) and a cruiser astern ( YAHAGI). All are on course 060 (T), speed 16
knots and not zigzagging.
Removed from the Navy
List.
Authors' Notes:
[1] Mt. Niitaka, located in Formosa
(now Taiwan), was the highest point in the Japanese Empire at the
time.
[2] In May 2007, Australian photo-journalist and wreck
diver Kevin Denlay and a group of divers aboard MV EMPRESS out of Singapore
explored the wrecks of PRINCE OF WALES and REPULSE. Both wrecks are virtually
upside down. PRINCE OF WALES lies at 223 feet/68 meters deep, while REPULSE lies
at 77 feet/54 meters. Attacking Japanese airmen reported hitting PRINCE OF WALES
with seven of 14 torpedoes they launched. British sources reported six torpedo
hits. The divers reported PRINCE OF WALES' hull had been hit by at least four
torpedoes. Japanese airmen also reported hitting REPULSE with 13 of 35
torpedoes. while British sources reported five torpedo hits. The divers reported
REPULSE's hull had been hit by at least two torpedoes, possibility more for
REPULSE, but these, if any more, could not be confirmed by the divers.
Readers interested in more on KONGO's final hours
should see "The Loss of Battleship KONGO" at http://www.combinedfleet.com/eclipkong.html
Thanks for assistance in researching the IJN
officers mentioned in this TROM go to Mssrs. Yutaka Iwasaki, Nishida Hiroshi,
Kuroyama Kazuo and Dr. Higuchi Tatsuhiro of Japan, Jean-François Masson of
Canada and Matthew Jones of the United States.
Thanks go to Rob Stuart of Canada for information about Operation "C" in
Revs 10 and 20. For more info see Rob's splendid "20 Ships, Not 23: Ozawa’s
Score, 5-6 April 1942." NB: Older map on this TROM page erroneously shows 23
ships sunk.
Thanks to the late John Whitman and to Gengoro Toda of Japan for info
about supply ship KITAKAMI MARU, and to Gilbert Casse for info for Rev 14..
- Bob Hackett, Sander Kingsepp and Lars Ahlberg.

