© 2000-2016 Bob Hackett and Sander Kingsepp
Revision 18
8 December 1941: The
Attack on Pearl Harbor:
Kure. Returns to Kure. Exchanges signals with the battleships of BatDiv 1, departing Hashirajima.
16 December 1941:
Battleship No. 1 is completed and registered in the Kure Naval District as YAMATO. Captain Takayanagi is the Commanding
Officer.
12 February 1942:
Departs Kure. Arrives at Hashirajima. The flag of the Combined Fleet's Commander-in-Chief Admiral (Fleet Admiral, posthumously) Yamamoto Isoroku (former CO of AKAGI) is transferred from
battleship NAGATO to YAMATO.
March 1942:
Inland Sea. Training and gunnery practice.
27 May 1942:
YAMATO is deemed operational.
29 May 1942:Operation "MI" - The Battle of Midway:
At 0600, YAMATO departs Hashirajima with the First Fleet, Main Body: BatDiv 1, light carrier HOSHO, seaplane/submarine
tenders CHIYODA, NISSHIN, DesRon 3's light cruiser SENDAI, nine destroyers, Supply Group No. 1. The Main Body remains 600 miles behind the Carrier Striking Force.
30 May 1942:
The Japanese intercept, but cannot decode, a report by USS CUTTLEFISH (SS-171) returning from patrol near Saipan. Around midnight, the IJN's 6th (Submarine) Fleet at Kwajalein also reports monitoring messages
exchanged by two American task groups located 170 miles NNE of Midway, moving westwards.
Aboard YAMATO, Admiral Yamamoto suggests that the information be relayed to the First Air Fleet's flagship, carrier AKAGI, but senior staff officer Captain Kuroshima cautions not to break radio silence.
5 June 1942:
0015: Admiral Yamamoto orders the night engagement cancelled.
0255: Yamamoto orders Operation MI cancelled.
9 June 1942:
The Chief of Staff of the First Air Fleet, Rear Admiral (later Vice Admiral) Kusaka Ryunosuke (former CO of AKAGI) and staff officers
Captain Oishi Tamotsu and Cdr (later Gen/CINC JSDF) Genda Minoru arrive aboard YAMATO from light cruiser NAGARA.
10 June 1942:
1200 miles SE of Tokyo. After sunset, an unidentified
submarine fires two torpedoes at YAMATO about 100 miles NNE of Minami-Torishima
(Marcus Island). YAMATO and the other ships in the Main Body turn to port and
both torpedoes miss.
14 June 1942:
At 1900, arrives at Hashirajima.
20-21 June 1942:
A staff conference is held aboard YAMATO regarding the changes in the current IJN shipbuilding policy. Many high-ranking officers of the Naval General Staff and Navy Technical Department (Kampon) participate.
14 July 1942:
NAGATO and MUTSU are reassigned to BatDiv 2. YAMATO remains
in BatDiv 1.
5 August 1942:
MUSASHI is assigned to the First Fleet, BatDiv 1 with
YAMATO.
17 August 1942:
Yamamoto and his staff depart Kure for Truk with the Main
Body: YAMATO, escort carrier KASUGA MARU (later renamed TAIYO), DesDiv 7's
AKEBONO, USHIO and SAZANAMI.
28 August 1942:
Near Truk. YAMATO is attacked by LtCdr (later Vice
Admiral) Glynn R. Donaho's USS FLYING FISH (SS-229). Since Donaho's ONI 41-42
"Recognition Manual" does not include the unknown YAMATO-class, he identifies
her as a "KONGO-class" battleship. Donaho fires four Mark 14 steam torpedoes and
thinks that he sees two hits, but they are premature explosions. YAMATO launches
at least one E13A1 "Jake" floatplane to counter-attack. FLYING FISH is bombed
and depth-charged by four escorts, but makes good her escape.
1 November 1942:
Aboard YAMATO, a festive dinner is held for all skippers stationed at Truk to celebrate the IJN's victory at the Battle of Santa Cruz.
17 December 1942:
Captain (later Rear Admiral) Matsuda Chiaki (former CO
of HYUGA) assumes command from Rear Admiral Takayanagi who is reassigned as CoS,
First Fleet.
11 February 1943:
Truk. After one year's service, Admiral Yamamoto's
Combined Fleet flag is transferred to YAMATO's new sister-ship MUSASHI.
3 April 1943:
Admiral Yamamoto and his staff depart Truk for Rabaul on two
Kawanishi H8K "Emily" flying boats to supervise Operation "I-GO" from 7 to 14
April. They are expected to return to MUSASHI on 19 April.
18 April 1943:
Acting on codebreaker's "Ultra" deciphers and as authorized
by President Roosevelt, 18 Army Air Force P-38s of the 70th and 339th Fighter
Squadrons of the 347th FG takeoff from Henderson Field, Guadalcanal and
intercept and kill Admiral Yamamoto over Bougainville while his Type 1
Mitsubishi GM4 "Betty" bomber is enroute from Lakunai airfield, Rabaul to
Ballale Island. A second Betty carrying Yamamoto's Chief of Staff, Vice Admiral
Ugaki is also shot down. Ugaki, although hurt in the crash, survives.
23 April 1943:
Truk. In the evening, a flying boat arrives carrying the
ashes of Yamamoto and six of his staff officers. Yamamoto's ashes are
transferred secretly to the Admiral's sea cabin under the supervision of senior
staff officer Captain Kuroshima Kameto.
25 April 1943:
Truk. At 1500, Admiral (Fleet Admiral, posthumously) Koga
Mineichi (former CO of ISE) arrives on an Emily from Yokosuka, ostensibly for an
inspection tour. It is not made public that he is the new CINC of the Combined
Fleet until Yamamoto's state funeral in Tokyo the next month.
1 May 1943:
Captain Matsuda is promoted to Rear Admiral.
8 May 1943:
Departs Truk for Yokosuka.
13 May 1943:
Departs Yokosuka for Kure.
21 May 1943:
Drydocked for inspection and repairs.
30 May 1943:
Undocked.
12 July 1943:
Kure. Drydocked. A Type 21, Mod 3, air and surface search
radar is installed. Twelve new (4x3) 25-mm AA guns are fitted on the weather
deck. YAMATO's total 25-mm. AA suite is now 36 guns. Her 155-mm. wing mount guns
are provided with coaming armor and their barbettes with 28-mm of additional
armor. YAMATO's fuel storage is reduced and her main and auxiliary rudder
controls are improved.
17 July 1943:
Undocked.
16 August 1943:
YAMATO, loaded with troops and supplies, departs Kure
with FUSO, NAGATO and DesDiv 16's AMATSUKAZE and HATSUKAZE. Stops at Yashima
anchorage that night.
17 August 1943:
YAMATO departs Yashima via Yokosuka for Truk in a task
group: battleships FUSO, NAGATO, escort carrier TAIYO, CruDiv 4's ATAGO and
TAKAO, DesDiv 7's USHIO, DesDiv 10's AKIGUMO and YUGUMO, DesDiv 16's AMATSUKAZE
and HATSUKAZE.
23 August 1943:
The task group arrives at Truk.
7 September 1943:
Captain (later Rear Admiral) Ono Takeji (former CO of
SUZUYA) assumes command from from Rear Admiral Matsuda who is reassigned to the
Imperial General Staff.
18 September 1943:
Truk. The fleet sorties to Brown Island, Eniwetok in
response to raids on Tarawa, Makin and Abemama Atolls launched by Rear Admiral
(later Vice Admiral) Charles A. Pownall's Task Force 15's carriers LEXINGTON
(CV-16), PRINCETON (CVL-23) and BELLEAU WOOD (CVL-24).
Vice Admiral Ozawa Jizaburo (former CO of HARUNA), in tactical command, leads the fleet's first section: BatDiv 1's YAMATO and NAGATO, CarDiv 1's SHOKAKU and ZUIKAKU, (followed by ZUIHO on 19 September), CruDiv 5's MYOKO and HAGURO, CruDiv 8's CHIKUMA and TONE, light cruisers AGANO, NOSHIRO and destroyers. Vice Admiral Kurita Takao leads the second section with his Advance Force: CruDiv 4's ATAGO, TAKAO, MAYA and CHOKAI.
Admiral Koga, CINC, Combined Fleet, remains at Truk in the fleet's flagship, MUSASHI with BatDiv 2's FUSO and BatDiv 3's KONGO and HARUNA.
25 September 1943:
No contact is made with Task Force 15. The fleet
returns to Truk.
5-6 November 1943:
Rear Admiral (later Vice Admiral) Alfred E.
Montgomery's (former CO of RANGER, CV-4) Task Force 14's carriers USS ESSEX
(CV-9), YORKTOWN (CV-10), LEXINGTON (CV-16), INDEPENDENCE (CV-22), BELLEAU WOOD
(CVL-24) and COWPENS (CVL-25) launch raids on Wake and the Marshall Islands.
17 October 1943:
The Japanese intercept radio traffic that suggests the
Americans are planning another raid on Wake Island. Admiral Koga sorties from
Truk to intercept the enemy carriers with BatDiv 1's YAMATO, MUSASHI,
NAGATO, BatDiv 2's FUSO, BatDiv 3's KONGO, HARUNA, CarDiv 1's SHOKAKU, ZUIKAKU
and ZUIHO, CruDiv 4's ATAGO, TAKAO, MAYA and CHOKAI, CruDiv 7's SUZUYA and
MOGAMI, CruDiv 8's CHIKUMA and TONE, light cruisers AGANO, NOSHIRO and OYODO and
destroyers.
19-23 October 1943:
Arrives at Brown Atoll, Eniwetok.
23 October 1943:
Departs Brown and sorties to a position 250 miles south
of Wake. Returns after no contact is made with enemy forces.
26 October 1943:
The fleet arrives back at Truk.
12 December 1943:
Departs Truk with CarDiv 1's SHOKAKU, DesDiv 4's TANIKAZE and DesDiv 10's AKIGUMO and KAZAGUMO covering troop transport operation "BO-1".
17 December 1943:
Arrives at Yokosuka. Loads supplies and the 2nd Battalion of the IJA's 1st Independent Mixed Regiment a 4,131-man organization mobilized on September 22.
20 December 1943:
Departs Yokosuka for Truk escorted by DesDiv 4's YAMAGUMO and TANIKAZE.
25 December 1943:
180 miles NE of Truk. At 0440 (K), LtCdr (later Rear Admiral) Eugene B. McKinney's USS SKATE (SS-305) is running on the surface at 10-13N, 150-27E. McKinney, acting on an "Ultra", picks up YAMATO at 27,300 yards. He dives and tries to close, but is unsuccessful until YAMATO turns towards him. He passes down her starboard beam, turns and at 0518 (K) fires his four stern tubes at her at 2,200 yards at 10-05N, 150-32E.
25 January 1944:
Captain Morishita Nobuei (former CO of HARUNA) assumes command from Rear Admiral Ono.
3 February 1944:
Undocked.
25 February 1944:
Kure. BatDiv 1's YAMATO and MUSASHI are reassigned from the First Fleet to the Second Fleet.
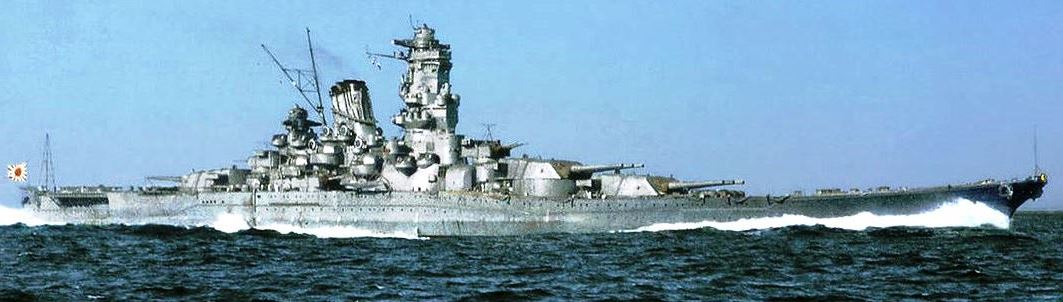
Drydocked. Two beam triple 6.1 inch (155-mm.) turrets are removed and replaced by six (3x2) 5-inch (127-mm.) HA AA mounts. Twenty-four (8x3) and 26 single 25mm. AA mounts are added. Shelters are also added on the upper deck for the increased AA crews. Type 13 air search and Type 22, Mod 4, surface search/gunnery control radars are installed and the main mast is altered. Two 150-mm searchlights are removed and later installed ashore at Kure.
YAMATO is fitted with Type 2 infrared (IR) Identification Friend-or-Foe (IFF)/signaling devices mounted midway up on each side of the bridge. The system may have been based on the German Seehund IR device. It is built around a telescopic sensor that receives light-waves in the IR range and registers a readout in the radio shack. The system also includes a pair of 20-mm. binoculars coaxially mounted with the transmitting IR lamp on the bridge so that another ship can use the IR detector for elementary signaling or as a formation light for station keeping.
About this time, YAMATO is also fitted with multiple E27 radar detectors copied from the German FuMB 1 Metox R.600.
18 March 1944:
Undocked.
11 April 1944:
Departs Kure for trials in the Iyo Nada; returns to Hashirajima that evening.
17 April 1944:
Returns to Kure to load supplies.
21 April 1944:
Departs Kure for Okinoshima. Loads troops.
22 April 1944:
Departs Okinoshima with cruiser MAYA, destroyers SHIMAKAZE, YUKIKAZE and two other destroyers.
28 April 1944:
Arrives at Manila, unloads troops and supplies, then departs.
1 May 1944:
Arrives at Lingga (near Singapore).
3 May 1944:
Lingga. Designated the flagship of Vice Admiral Ugaki Matome's (former CO of HYUGA) BatDiv 1.
11 May 1944:
Steams with Vice Admiral Ozawa Jisaburo's (former CO of HARUNA) Mobile Fleet from Lingga to Tawi Tawi.
14 May 1944:
Anchors at Tawi Tawi.
May-June 1944:
Tawi Tawi, YAMATO and MUSASHI participate in joint gunnery drills at ranges of almost 22 miles.
7 June 1944:
Bongao, Tawi Tawi. YAMATO receives fresh provisions replenishment from supply ship KITAKAMI MARU.
Shortly after departure, a periscope (perhaps HARDER's) is sighted and a submarine alert is given. All ships quickly execute "hard left-rudder," but MUSASHI turns too late. She closes on YAMATO just ahead. On YAMATO's bridge, near panic reigns! Captain Morishita takes over the helm himself and carries out an evasive turn, but the situation remains critical. Then a lookout reports that the "ship behind us has stopped." All aboard both super-battleships are relieved that a collision between them has been avoided on the eve of battle.
12 June 1944:
The U.S. Invasion of Marianas begins. Operation KON is "postponed". Ugaki's force arrives at Batjan where they are joined by CruDiv 5's HAGURO and MYOKO and destroyer ASAGUMO.
13 June 1944:
At 2200, Ugaki's force departs Batjan to rendezvous with the Mobile Fleet.
15 June 1944:
E of Mindanao. The YAMATO group is sighted and reported by Cdr (later Captain) Slade D. Cutter's USS SEAHORSE (SS-304).
17 June 1944:
Refuels from the 1st Supply Force's oilers, then joins the Mobile Fleet. Later, the Mobile Fleet is sighted by USS CAVALLA (SS-244) in the Philippine Sea.
19-23 June 1944: Operation "A-GO" - The Battle of the Philippine Sea:
Vice Admiral Kurita's Second Fleet steams about 100 miles ahead of Vice Admiral Ozawa's carriers.
At 0920, YAMATO's lookouts spot aircraft approaching at 13,125 feet. This is the fighter unit of Air Group 601's second strike. Admiral Kurita has received no information about a friendly overflight. Cruiser TAKAO fires four starshells meaning "identify yourself", but no reply is received. The planes keep approaching.
At 16,400 yards, YAMATO and the other ships execute a turn to port and open fire. YAMATO's main guns, loaded with "Sanshiki-dan" shells, are fired in anger for the first time - but at friendly forces! Four Mitsubishi Zeke fighters are damaged. Another ditches. YAMATO may have damaged some of the planes. MUSASHI's lookouts correctly identify the planes and she is the only ship that does not open fire.
The Mobile Fleet's aircraft attack U.S. Task Force 58 off Saipan but suffer overwhelming losses in the "Great Mariana's Turkey Shoot". YAMATO remains undamaged and retires northward with the Mobile Fleet.
22 June 1944:
The Mobile Fleet arrives at Nakagusuku, Okinawa. Refuels destroyers, then departs.
24 June 1944:
The Mobile Fleet arrives at Hashirajima.
29 June-8 July 1944:
Departs Hashirajima for Kure with BatDiv 1's MUSASHI.
8 July 1944:
Kure. YAMATO and MUSASHI load 3,522 men and materials of the IJA's 49th Division's 106th Infantry Regiment then depart Kure for Okinawa with Group A's CruDiv 4's ATAGO, TAKAO, MAYA and CHOKAI, CruDiv 7's KUMANO, SUZUYA, TONE and CHIKUMA, DesRon 2's light cruiser NOSHIRO and destroyers accompanied by Group B's KONGO NAGATO, CruDiv 7's MOGAMI, DesRon 10's light cruiser YAHAGI and destroyers.
10 July 1944:
Group A detaches from Group B. Departs Okinawa for Lingga (S of Singapore) to join the Mobile Fleet.
16 July 1944:
CruDivs 4, 7 and DesRon 2 are detached from Group A for Singapore. BatDiv 1 and its escorts continue to Lingga Roads.
17 July 1944:
Arrives at Lingga. Remains in the vicinity for three months conducting training with MUSASHI and other fleet units.
15 October 1944:
Captain Morishita is promoted to Rear Admiral.
18 October 1944:
Black deck camouflage, intended for the night breakthrough in the San Bernardino Strait, is hastily applied to both YAMATO and MUSASHI. The main component is soot from YAMATO's stack.
18-20 October 1944:
The fleet departs Lingga for Brunei Bay, Borneo to refuel.
22 October 1944: Operation "SHO-I-GO" (Victory)
- The Battle of Leyte Gulf:
YAMATO receives Mitsubishi F1M2 "Pete"
aircraft from NAGATO. Sorties from Brunei towards Philippines with Vice Admiral Kurita Takeo's First Mobile Striking Force, First Section, Force"A" (Center Force) BatDiv 1's YAMATO, MUSASHI and NAGATO, CruDivs 4, 5 and DesRon 2.
23 October 1944: The Battle of the Palawan Passage:
Two American submarines attack Force A. Cdr (later Captain) David H. McClintock's USS DARTER (SS-227) sinks Kurita's
flagship, cruiser ATAGO. Kurita abandons ship and is picked from the water by destroyer KISHINAMI. Ten hours later, he transfers to YAMATO and resumes command of the First Diversion Attack Force. Cdr (later Captain) Bladen D. Claggett's USS DACE (SS-247) sinks cruiser MAYA. DARTER also damages cruiser TAKAO.
24 October 1944: The Battle of the Sibuyan Sea:
0810: Three enemy scout planes are sighted, bearing 10, range 31 miles. Speed is increased to 18 knots.
1026: YAMATO opens fire on enemy aircraft, using her main guns and Type 3 "sanshikidan" rounds.
1032: Attacked by two Grumman TBF "Avengers" from USS CABOT (CVL-28). No hits are scored.
1047: From this time on, lookouts on YAMATO, MUSASHI, CHOKAI, NOSHIRO and KISHINAMI report periscope and torpedo wake sightings. Several false sightings delay the fleet reforming.
1331: YAMATO opens fire on aircraft from TG 38.3.
1350: A Curtiss SB2C "Helldiver" dive-bomber from USS ESSEX (CV-9) drops two AP bombs that damage the port bow abreast of main gun turret No. 1.
1413: Lookouts sight aircraft from ESSEX approaching. Vice Admiral Kurita's fleet orders the Force to increase speed to 22 knots.
1430: Attacked by four Grumman F6F "Hellcat" fighters and 12 SB2C dive-bombers. They drop five 1000-lb AP and seven AP bombs. The first bomb penetrates the anchor deck, demolishes the port chain locker, explodes below the waterline, blows out a side plate and holes the bow. The mess deck is wrecked. Two bombs hit turret No. 1. One blows a hole above the waterline. Another bomb penetrates through the top deck to the crews' quarters.
YAMATO ships 3, 000 tons of seawater and takes on a five-degree list to port. Damage Control counterfloods and reduces the list to one degree. YAMATO is down by the bow and maintains a 2-ft, 8-in. bow trim.
Force "A" continues on course through the Sibuyan Sea. During the day, the Force endures raids by over 250 U.S. carrier aircraft. MUSASHI is hit by numerous aircraft torpedoes, bombs and sinks in the Visayan Sea. NAGATO takes two bomb hits. HARUNA is damaged by near-misses.
1530: Admiral Kurita orders the Force to reverse course back through the Sibuyan Sea.
1715: Force A again reverses course.
2330: Force A enters the narrow San Bernardino Strait hours in single file.
25 October 1944: The
Battle off Samar:
0335: San Bernardino Strait. Force A exits the strait and proceeds eastward.
0400: Off Samar Island. Force A changes course due south towards Leyte Gulf.
0523: YAMATO's Type 13 radar picks up enemy aircraft.
0544: Enemy carriers sighted on the horizon, hull down, bearing 60 to port, range 23 miles. They are misidentified as six fleet carriers, escorted by three cruisers and two destroyers.
0545: YAMATO opens fire on enemy planes.
0558: Force A opens fire at escort carriers of "Taffy 3": USS ST. LO (CVE-63), WHITE PLAINS (CVE-66), KALININ BAY (CVE-68), FANSHAW BAY (CVE-70) (F), KITKUN BAY (CVE-71) and GAMBIER BAY (CVE-73). Carriers screened by destroyers USS HOEL (DD-533), JOHNSTON, (DD-557), HEERMANN (DD-532), destroyer escorts USS SAMUEL B. ROBERTS (DE-413), DENNIS (DE-405), RAYMOND (DE-341) and JOHN C. BUTLER (DE-339).
Both of YAMATO's forward turrets open fire at a distance of 20 miles. Of her six forward rifles only two are initially loaded with AP shells, the remainder with Type 3s. YAMATO's F1M2 "Pete" spotter plane confirms that the first salvo is a hit. The carrier starts to smoke. Three six-gun salvos are fired on the same target, then the fire is shifted to the next carrier. It is concealed immediately by a smoke screen made by the American destroyers.
0606: YAMATO continues on an easterly course, firing her 155-mm (6.1-inch) secondary guns.
0651: A charging "cruiser" emerges from behind the smoke. YAMATO engages her from a distance of more than 10 miles and scores a hit with the first salvo. The target is seen burning before it is lost sight of.
At 0654, destroyer HEERMANN fires three torpedoes at HARUNA. The torpedoes miss HARUNA, but head toward YAMATO whose crew spots their tracks to starboard. YAMATO turns away to port, steams northward for 10 miles until the torpedoes run out of fuel. Although the maneuver avoids the torpedoes, it puts YAMATO and the Force's commander, Vice Admiral Kurita out of the battle.
0755-0910: Force A sinks GAMBIER BAY, HOEL, ROBERTS and the JOHNSTON. Kurita orders all ships to head north, but at 1020 he reverses course southward and again heads towards Leyte Gulf.
0910: Nine Mitsubishi A6M "Zeke" fighters led by Lt (Cdr posthumously) Seki Yukio of the 201st Naval Air Group's Shikishima-tai kamikaze squadron group fly over Kurita's fleet in search of the U.S. carriers.
1020: Kurita orders the course reversed to southward. The Force again heads towards Leyte Gulf.
1030-1320: CHOKAI, CHIKUMA and SUZUYA are disabled by battle damage, drop out of formation, and are subsequently lost. Force A reverses course northward and at 2100 retires through San Bernardino Strait.
26 October 1944:
0800. Tablas Strait off Panay. Force A is attacked by
about 30 Grumman TBM Avengers from the USS WASP (CV-19) and USS COWPENS
(CVL-25).
0834: The Force is attacked by about 50 Curtiss SB2C "Helldivers" and "Avenger" torpedo planes from USS HORNET (CV-12). Two bombs hit YAMATO. The first penetrates the forecastle forward and to the right of the main breakwater, demolishing nearby crew's spaces. The second bomb causes slight damage to the side of main gun turret No. 1.
1040: About thirty 13th Army Air Force Far Eastern Air Force B-24 "Liberators" of the "Long Rangers" based at Morotai attack the Force. Bomb fragments wound Rear Admiral (later Vice Admiral) Koyanagi Tomiji (former CO of KONGO), Chief of Staff, Second Fleet and about 60 others. YAMATO and NAGATO open fire with their main armament using Type 3 sanshikidan shells. Their gun crews claim several bombers shot down.
1100: Sixty aircraft from Task Groups 38.2 and 38.4 attack the Force. Light cruiser NOSHIRO is sunk.
27 October 1944:
No attacks. Twenty-nine YAMATO crewmen killed in
action buried at sea.
28 October 1944:
Force "A" arrives at Brunei and refuels from oilers.
6 November 1944:
Carrier JUNYO and light cruiser KISO, escorted by DesDiv 30's YUZUKI and UZUKI arrive at Brunei from Sasebo with ammunition resupply for Kurita's force.
8 November 1944:
YAMATO sorties from Brunei to Pratas Islands to avoid
air raids with NAGATO, HARUNA and KONGO and escorts. JUNYO, cruisers TONE
and ASHIGARA, light cruiser KISO and DesDiv 30 follow. Later, JUNYO, TONE, KISO and
DesDiv 30 are detached to Manila. The remainder of the task group makes a feint
through the Balabac Strait, then returns to Brunei.
11 November 1944:
The YAMATO group arrives at Brunei.
15 November 1944:
BatDiv 1 is disbanded. YAMATO is assigned as the
flagship of the Second Fleet.
16 November 1944:
Departs Brunei for Kure with KONGO, NAGATO and escorts.
21 November 1944:
The YAMATO group is attacked by USS SEALION II
(SS-215). KONGO and destroyer URAKAZE are sunk.
23 November 1944:
Arrives at Kure.
25 November 1944:
Kure. Drydocked. Begins battle damage repairs and
refit. Twenty-four older 25-mm AA single mounts are removed. Twenty-seven 25-mm
AA guns (9 triple mounts) are fitted in their place. YAMATO's final AA
complement is 152 25-mm AA guns (50 triple mounts, 2 single mounts).
Captain Aruga Kosaku (former CO of CHOKAI) assumes command from Rear Admiral Morishita.
23 December 1944:
At Kure. The former Vice Chief of the Naval General
Staff, Vice Admiral (Admiral, posthumously) Ito Seiichi (former CO of HARUNA)
assumes command of the now diminutive Second Fleet. Vice Admiral Kurita is
reassigned as President of the Etajima Naval Academy.
1 January 1945:
YAMATO, HARUNA and NAGATO are assigned to the reactivated
BatDiv 1, Second Fleet.
3 January 1945:
Undocked.
15 January 1945:
Moves from Kure to Hashirajima.
10 February 1945:
BatDiv 1, Second Fleet is deactivated for the last
time. YAMATO is reassigned to CarDiv 1.
13 March 1945:
Hashirajima. Mistakenly, YAMATO fires on 343rd NAG
Kawanishi N1K2-J Shiden Kai "George" fighters on patrol from their base at nearby Matsuyama airfield.
March 1945:
Returns to Kure.
19 March 1945:
Vice Admiral (later Admiral) Marc A. Mitscher's (former CO
of HORNET, CV-8) Task Force 58 carriers USS ESSEX (CV-9), INTREPID (CV-11),
HORNET (CV-12), WASP (CV-18), HANCOCK (CV-19), BENNINGTON (CV-20) and BELLEAU
WOOD (CVL-24) make the first carrier attack on the Kure Naval Arsenal.
More than 240 aircraft (SB2C Helldivers, F4U "Corsairs" and F6F Hellcats) attack the battleships HYUGA, ISE, YAMATO, HARUNA, carriers AMAGI, KATSURAGI, RYUHO and KAIYO and other ships.
YAMATO, underway in the Inland Sea, sustains minor damage from a hit on bridge by a Helldiver dive-bomber from INTREPID.
The fleet is defended vigorously but unsuccessfully by 54 "George" fighters of Captain (later General and CINC, JSDF*) Genda Minoru's (of AKAGI at Pearl Harbor) 343rd NAG. The pilots, led by Lt Oshibuchi Takashi, claim 52 aircraft shot down against 14 fighters lost and one Nakajima C6N1 Saiun "Myrt" that collided with a Hellcat. Japanese flak claims five more planes.
28 March 1945:
Tokuyama Navy Fuel Depot, Yamaguchi Prefecture. Tanker MITSUSHIMA MARU arrives from Singapore. YAMATO takes on about 1,000-tons of fuel oil from her. MITSUSHIMA MARU unloads 9279-tons of crude oil at the depot. At 1730, that same day, the Second Fleet departs Hashirajima for Sasebo.
1800: Vice Admiral Ito's fleet is recalled after Headquarters, Combined Fleet receives a report about a TF 58 raid on airfields in southern Kyushu.
29 March 1945:
At Kure. Awaits sailing orders. YAMATO takes aboard a full supply of ammunition: 1,170 rounds for her 18.1-inch guns, 1,620 rounds for her secondary guns, 13,500 anti-aircraft rounds and 11.5 million for smaller caliber guns. YAMATO receives fuel from the destroyers HANAZUKI and ASASHIMO. Light cruiser YAHAGI receives fuel from destroyer HATSUSHIMO.
2 April 1945:
1000: YAMATO departs Kure for anchorage at the Mitajiri
Bight.
3 April 1945:
0918: The Second Fleet receives an order from the
Commander-in-Chief Combined Fleet Admiral Toyoda Soemu (former CO of HYUGA)
alerting it about a sortie to Okinawa.
4 April 1945:
Three Mitsubishi A6M Zeke fighters of the 332nd Kokutai from
the nearby Iwakuni Air Base fly very low over YAMATO to act as targets for
gunnery training for the ship's new and untrained AA crews.
5 April 1945: Operation "TEN-ICHI-GO" (Heaven Number One):
1359: A
detailed order is received: "The Surface Special Attack Unit is ordered to
proceed via Bungo Suido Channel at dawn on Y-1 day to reach the prescribed
holding position for a high-speed run-in to the area west of Okinawa at dawn on
Y-day. Your mission is to attack the enemy fleet and supply train and destroy
them. Y-day is April 8th."
1500: Captain Aruga informs his assembled crew about the sortie.
1730: Sixty-seven naval cadets of Etajima class No. 74, who arrived three days before, are sent ashore. Then a farewell party is held aboard YAMATO.
6 April 1945:Operation
TEN-ICHI-GO - The Attack on American Invasion Forces at Okinawa:
Mitajiri anchorage. In the early morning, Vice Admiral Kusaka
Ryunosuke (former CO of AKAGI), Chief of Staff of the Combined Fleet,
accompanied by Cdr Mikami Sakuo of the Combined Fleet Staff arrive by a float
biplane from Kanoya to confer about the mission with Vice Admiral Ito,
Commander, Second Fleet and staff.
The sick and some older sailors disembark. YAMATO departs Mitajiri for the Tokuyama Oil Depot. YAMATO takes on 3, 400 tons of fuel oil. The destroyers also refuel.
1520: Departs Tokuyama escorted by DesDiv 43: HANAZUKI, KAYA, MAKI as far as the Bungo Suido where the destroyers detach for port. Vice Admiral Ito leads the Surface Special Attack Force: YAMATO, DesRon 2's light cruiser YAHAGI, DesDiv 17's ISOKAZE, HAMAKAZE and YUKIKAZE, DesDiv 21's KASUMI, HATSUSHIMO and ASASHIMO, DesDiv 41's FUYUZUKI and SUZUTSUKI. Earlier, two Nakajima A6M2-N "Rufe" float planes and six submarine chasers are dispatched to search the area.
1830: The Attack Force negotiaties the western channel of Bungo Suido at 22 knots when a patrol plane radios YAMATO that it has sighted an enemy submarine ten miles from Tsukudajima. The Attack Force changes course to 140 degrees and assumes an anti-submarine formation. To avoid a submarine in the Hyuga-nada, the force changes to a westerly course. The escorting destroyers move ahead and the whole group begins zigzagging. A lookout on ISOKAZE spots submarine USS THREADFIN (SS-410) on the surface.
2100: The Attack Force swings to the south to avoid a possible torpedo attack.
2144: THREADFIN radios a detailed sighting report of the Attack Force's presence in the Bungo Suido to COMSUBPAC at Guam. The report is intercepted by YAMATO. Later, USS HACKLEBACK (SS-295) also sights the Attack Force and reports, but neither submarine is able to close the range for an attack.
7 April 1945:
0200: The Attack Force, zigzagging at 22 knots on a
southerly course, passes the Miyazaki coast and reaches the entrance to Osumi
Kaikyo Channel. Speed is slowed to 16 knots.
0600: YAMATO launches her Aichi E13A1 Type 0 "Jake" reconnaissance floatplane.
0630: Six Mitsubishi A6M Zeke fighters of Vice Admiral Ugaki's 5th Air Fleet's 203rd Naval Air Group arrive to provide air cover. For the next three and one-half hours, a total of 14 Zekes from the Kasanbara air base on Kyushu, provide cover in small groups. YAMATO's "Jake" returns to Kyushu.
0657: ASASHIMO begins lagging behind the force with engine trouble.
0832: The Attack Force is sighted by a searching Grumman F6F Hellcat from USS ESSEX (CV-9).
0840: The Attack Force briefly sights seven "Hellcat" fighters, but they are not seen by the escorting Zekes.
1014: The Attack Force sights two large Martin "Mariner" PBM flying boats. The Japanese also spot HACKLEBACK trailing the Attack Force.
1017: YAMATO turns towards the planes and opens fire unsuccessfully as does cruiser YAHAGI. While YAHAGI jams their sighting messages, YAMATO receives a report from a Japanese scout plane that Task Force 58 has been located east of Okinawa, 250 nautical miles from the Attack Force.
1018: The aircraft are lost behind the clouds. Both ships cease firing.
1022: The Attack Force turns towards Sasebo.
1107: YAMATO's Type 13 air search radar operator reports contact with a large aircraft formation at his set's maximum range of 63 miles. He reports the formation at bearing 180, heading north, and splitting into two groups. All ships increase speed to 25 knots and commence a simultaneous turn.
1115: A report that had been delayed for 25 minutes by ransmission and decoding, is received finally. It says that the Kikaigashima Island lookout station saw 150 carrier planes heading northwest. Just then, eight F6F Hellcats appear and begin circling over the force to maintain contact until the main formation arrives. YAMATO and YAHAGI open fire, increase speed to 24 knots and commence a series of sharp evasive maneuvers.
Air search reports two groups of aircraft, range 44 miles, closing at high speed. The sky is still overcast and visibility is poor. Then radar reports the closing aircraft have turned towards the force. The Attack Force resumes zigzagging.
1129: The Attack Force turns to course 205, towards Okinawa.
1222: A lookout spots three Japanese troopships on bearing 0250 heading for Amami-Oshima.
1232: A lookout spots American planes 25 degrees to port, levation 8, range 4,375 yards, moving to port. This is the first wave of 280 aircraft (132 fighters, 50 bombers, 98 torpedo planes) from Task Group 58. 1's USS HORNET (CV-12), HANCOCK (CV-19), BENNINGTON (CV-20), BELLEAU WOOD (CVL-24) and SAN JACINTO (CVL-30) and from Task Group 58. 3's USS ESSEX (CV-9), BUNKER HILL (CV-17), BATAAN (CVL-24) and CABOT (CVL-28).
Lagging behind the main force, destroyer ASASHIMO is attacked and sunk by aircraft from SAN JACINTO.1234: YAMATO opens fire with her two forward main turrets and AA guns.
1235: YAMATO stops zigzagging and increases speed to 24 knots. Her nine 18.1-inch guns firing Sanshikidan beehive shells, twenty-four 127-mm. AA guns and one hundred fifty-two 25-mm AA guns all open fire. The American planes release their bombs and torpedoes and strafe the bridge with machine-gun fire.
1240: YAMATO is hit by two AP bombs. Smoke rises from the vicinity of the mainmast and a bomb explodes in the same area. The aft secondary battery fire control, secondary gun turret and the air search radar are knocked out.
The Attack Force changes course to 100 degrees. Helldivers from BENNINGTON and HORNET attack from port. At flank speed, YAMATO commences a right turn but two 1000-lb AP bombs hit her. The first explodes in the crew's quarters abaft the Type 13 radar shack. The second penetrates the port side of the aft Command station and explodes between the 155-mm gun magazine and main gun turret No. 3's upper powder magazine. It starts a fire that cannot be extinguished and rips a 60-foot hole in the weather deck. One Helldiver is shot down, another is damaged badly.
1243: A section of five low-flying Avengers from HORNET start a torpedo run from the port, bearing 70 degrees. YAMATO, at 27 knots flank speed, heels to starboard in evasive action. The Avengers drop three torpedoes. One strikes her port side near the forward windlass room. One Avenger is shot down.
The YAMATO ships 2,350-tons of water. Damage Control counterfloods with 604-tons of water. Fourteen F4U Chance-Vought Corsairs from BUNKER HILL strafe and rocket YAMATO but cause only minor damage.
1245: Thirty-four Hellcats, 22 Helldivers and one Corsair attack YAMATO's escorts. DesDiv 17's HAMAKAZE takes a near miss on her starboard quarter that disables her starboard shaft.
1247: A torpedo strikes HAMAKAZE starboard, aft of amidships and she jackknifes. SUZUTSUKI takes a 500-lb GP bomb hit to starboard, abreast her No. 2 gun mount. Two dud rockets hit FUYUTSUKI.
1250: The first attack wave retires. Destroyer SUZUTSUKI wreathed in black smoke, burns furiously. Light cruiser YAHAGI, without headway, drifts helplessly behind the main force. YAMATO, despite hits by two bombs and one torpedo, maintains flank speed.
1300: YAMATO changes course to 180 degrees, due South.
1302: Her remaining air search radar reports the approach of a second attack wave. The Attack Force changes course due south to 180 degrees.
1302: Fifty aircraft from ESSEX and BATAAN are sighted approaching from the SSW, range 18.5 miles.
1322: YAMATO increases speed to 22 knots. A Corsair from ESSEX drops a 1000-lb GP bomb that hits the superstructure in the port bow area. Twelve Helldivers claim several hits near the bridge and main gun turret No. 3. Five Helldivers are damaged by AA fire.
1333: Another 110 aircraft from Task Group 58. 4's YORKTOWN (CV-10), INTREPID (CV-11), LANGLEY (CVL-27) engage the Attack Force. This time all the attacks are concentrated against the battleship. Twenty Avengers make a new torpedo run from 60 degrees to port. YAMATO starts a sharp turn to port but three torpedoes rip into her port side amidships. Her auxiliary rudder is jammed in position hard port.
YAMATO has taken a total of four torpedo hits. She ships about 3,000-tons of seawater. She lists about seven degrees to port. Damage Control counter-floods both starboard engine and boiler rooms and almost entirely corrects the list.
YAMATO starts a turn starboard to course 230 degrees. One of her lookouts spots the tracks of four torpedoes approaching. The first torpedoes pass by harmlessly, but the remaining two strike her port amidships. She takes on a heavy list to port and her speed drops to 18 knots. Armor-piercing and other bombs make a shambles of her upper works.
1342: YAMATO turns hard to port. She continues to throw up a screen of desperate flak fire. One Avenger is shot down but her barrage is largely ineffective because each AA battery fires independently without coordination. The escorts cannot defend the flagship either.
1402: Three bombs explode port amidships, five minutes later a torpedo hits her starboard side amidships. Ten minutes later, two more torpedoes strike her port side. YAMATO's list increases to about 15 degrees and her speed slows to 12 knots.
Executive Officer Nomura Jiro reports to Captain Aruga that his damage control officers are all dead and that counter-flooding can no longer correct the list. He suggests the order to abandon ship be given. The Fleet Commander, Vice Admiral Ito, orders the mission cancelled and directs the remaining ships to pick up as many survivors as possible. The Emperor's portrait is removed.
1405: Light cruiser YAHAGI, hit by 12 bombs and seven torpedoes sinks exactly one minute after the last bomb hits. LtCdr (later Captain) Herbert Houck, the leader of 43 TBM Avengers of VT-9 from YORKTOWN, detaches Lt Thomas Stetson's six Avengers in a final torpedo attack from the ship's starboard side. Stetson's crewmen reset their Mark 13 torpedoes' running depth to 20 feet. Listing heavily to port, YAMATO's exposed hull is hit by several more torpedoes. She rolls slowly over her port side on her beam ends.
1423: YAMATO's No. 1 magazine explodes and sends up a cloud of smoke seen 100 miles away. She slips under followed by an underwater explosion. YAMATO sinks at 30-22 N, 128-04 E.
Vice Admiral Ito and YAMATO's skipper Captain Aruga and 3,055 of 3,332 crewmen are lost. 276 men are rescued including Rear Admiral Morishita Nobuei, Chief of Staff, Second Fleet (and former YAMATO skipper). Aruga receives a rare double promotion posthumously to Vice Admiral on the request of Admiral Toyoda. Later that day, battered destroyers ISOKAZE and KASUMI are scuttled and sink. 1,187 crewmen of DesRon 2's light cruiser YAHAGI and the four destroyers are also lost.
The Imperial Japanese Navy ceases to exist as a fighting force. The Americans lose 10 aircraft and 12 crewmen.
3 May 1945:31 August 1945:
Removed from Navy List.
1 August 1985:
A Japanese team in deep research submersible PISCES II locates YAMATO 1,410 feet deep in the East China Sea. The wreck is in two pieces. Its forward section is on its starboard side, while the aft section is bottom up.
24 January 2009:

