 |
 |
The Solomon Islands were the scene of the Pacific war's lengthiest and most bitterly fought naval campaign. Including the fighting in the immediate vicinity of Guadalcanal, more than a dozen battles raged in these confined waters. Most of them were night surface battles, where the weapons and tactics of the Japanese Navy were at their finest. Unfortunately, the Japanese were faced with a foe willing to accept heavy losses in order to prevail, and also one who learned from past mistakes.
Legend:
#1 = Battle of Eastern Solomons, August 23-25, 1942
The Americans would have had three carriers with which to meet the Japanese force, but Wasp was detached to refuel on the 23rd, so she would be out of the coming action. Thus, the Americans would field two carriers (Saratoga and Enterprise) and 176 aircraft to the Japanese two heavy carriers (Shokaku, Zuikaku) and one light carrier (Ryujo) and 177 aircraft; pretty much a straight-up fight. As he was prone to, however, Yamamoto divided his forces, sending Ryujo off by herself in advance of the main force, ostensibly to be in a position to attack Henderson Field, as well as supporting the Guadalcanal reinforcement convoy under Raizo Tanaka coming down the Slot from Rabaul.
As usual, division of forces cost the Japanese, as the Americans got in the first blow. Catching Ryujo by herself, and with most of her fighters either gone (on a strike against Guadalcanal) or (inexplicably) still on her decks, they quickly turned her into a burning, sinking wreck. The Japanese heavy carriers, however, counterattacked and damaged Enterprise badly with three bomb hits. However, she managed to transfer the majority of her airwing to Henderson Field before limping away to the southeast. A second Japanese strike failed to find the Americans (which meant that Enterprise would live to fight another day). After an abortive attempt to engage the Americans in a night surface fight with battleships and cruisers, the Japanese Main Force began retiring to Truk.
This was a mistake. The Japanese heavy carriers were thus far unscathed, while they had rendered one of the American CVs impotent, thus leaving them with the advantage. Instead, by withdrawing, Yamamoto had left Tanaka's reinforcement convoy practically unprotected in the Slot. On the morning of the 25th, as the Japanese began approaching Taivu Point, American aircraft from Henderson found the convoy and gave it a pasting. A transport was sunk, and an older destroyer so badly hit that she had to be scuttled. Several other warships were damaged. At this point, Tanaka wisely withdrew.
The Japanese had an opportunity for a decisive victory and had failed to grasp it. American carrier power in the region was diminished, but not broken. Further, with the installation of Enterprise's aircraft at Henderson, the American airfield was a more prickly target than ever. This established an operational precedent, as Henderson would be fed a steady stream of carrier-borne reinforcements. Because of American airpower, the waters around Guadalcanal would continue to be a very dangerous place during the daylight hours.
The Americans got their licks in early, punching a 50-foot hole in Zuiho's flight deck and sending her back to Truk. However, the Japanese put together a very effective attack against Hornet which left her dead in the water. Enterprise and several other American ships were also damaged. Several attacks later in the day crippled Hornet beyond repair, and as attempts to tow her had proved futile, she was abandoned. At 0030 October 27 Japanese destroyers AKIGUMO and MAKIGUMO fired three torpedoes to finish her off and HORNET rolled over to starboard and sank stern first. An American counterattack had badly damaged Shokaku, necessitating her withdrawal, and both the Japanese and the Americans quit the field soon thereafter. American losses had been more serious, but again they had managed to stave off the Japanese efforts to nullify Henderson Field.
Unbeknownst to the Japanese, the American air force had been experimenting with a new aerial tactic called skip-bombing, wherein the attacking airplane drops a bomb with a long-delay fuze close to the surface and lets it skip into the side of the target ship. This was the first occasion in which the Americans would use this new tactic. As soon as the Japanese came under the radius of American airpower, the convoy was attacked relentlessly. The first day's attack (by high altitude B-17s) sank two transports and damaged a third. Two destroyers were tasked with rescuing the survivors and making a high speed run to New Guinea to deposit them. This they did, and returned to the plodding convoy before dawn the next day.
March 4 proved to be a disaster for the Japanese. Coming within range of American and Australian medium bombers, the convoy was savaged by skip-bombing and strafing. By noon, all six remaining transports were sunk or sinking along with two of the destroyers flagship SHIRAYUKI and ASASHIO were sunk and another two destroyers crippled. These two cripples - ARASHIO and TOKITSUKAZE - were finished off the next day. The remaining four destroyers recovered what few survivors they could and fled north to Rabaul. After this, the Japanese would never again attempt to run slow transports into the face of American airpower.
The Americans maintained a line-ahead formation and began firing at 2357. They quickly demolished Niizuki, which drew fire from every American cruiser. The first salvos crushed NIIZUKI's bridge and knocked out No.2 turret. Akiyama and staff were probably killed almost instantly. However NIIZUKI returned fire with her aft turrets and appears to have fired torpedoes. Afire and badly damaged, NIIZUKI temporarily lost helm control and sheared out of the formation. American guns then turned to other targets. Japanese torpedoes were already in the water, however, and at 0003 they hit HELENA, which lost her bow back to the No. 2 turret, and then took another two hits which sank her. Meanwhile, NIIZUKI had very briefly recovered, radioing SUZUKAZE she could make 23 knots and would catch up, but just after was apparently hit and destroyed by U.S. destroyer torpedoes slamming into the starboard bow and sunk. Other Japanese vessels were damaged by gunfire, and while retiring from the battle and heading toward Vila at high speed NAGATSUKI had come too close to shore and at 0049 run aground on the southern side of the entrance to Bambari Harbor some 5 odd miles short of her goal. All the troops and crew were offloaded. The other Japanese ships disembarked their cargo at Vila as planned. Both forces began a general retirement.
However, both sides still had destroyers in the area attempting to rescue survivors; one Japanese and two American. Around 0500 Amagiri and Nicholas exchanged torpedoes and then gunfire. Amagiri was hit and retired, leaving all but a few of Niizuki's survivors to their fate.(Some seem to have swum ashore or been captured) The Americans, by contrast succeeded in rescuing many of Helena's survivors. The final casualty was grounded NAGATSUKI; abandoned by her crew in the morning after they failed to get her afloat, she was bombed into a sinking state by US planes.
The losses were about even for both sides. Given the disadvantages the Japanese had labored under, the Americans really ought to have done better. This battle is intriguing, too, for the fact that it was the Japanese who used their search radar effectively. However, American radar gunfire control (which the Japanese still did not have) had allowed them to inflict rapid damage to the opposing force.
The Americans then closed in to finish the job with gunfire. Practically no resistance came from the crippled Japanese DDs. Shigure had no choice but to run for her life. In all, the Japanese had lost three ships and over 1,200 men. The Americans suffered not a single casualty.
This battle is important because for the first time American destroyers had demonstrated that, given the opportunity, they could meet and best their opposite numbers. By being relieved of their normal duties of screening cruisers, and the linear tactics that role had thus far imposed, the American DDs were able to employ innovative torpedo tactics which had worked beautifully. The Japanese Navy had been served notice that its reign of nighttime torpedo supremacy was at an end.
Both forces spotted each other at 0029 on the 18th. The Japanese launched torpedoes at very long range, but the Americans had formed up line abreast and thus combed their wakes. After another series of manuevers, however, the two destroyer forces found themselves line abreast and within long gunfire range. Both groups hammered away at each other, but were generally ineffective. At around 0100 the Isokaze's radar (erroneously) detected another American force closing from the south, at which point the Japanese retired. In the interim, though, most of the Japanese barges had scattered, leaving only two for the Americans to find and sink.
Neither side had been particularly impressive this night. The only redeeming feature for the Americans was the fact that with radar controlled gunfire they had at least scored more near-misses and straddles than their enemy. The other important thing to note is that, once again, the Americans had demonstrated that their destroyers (at least) were beginning to learn how to take the sting out of Japanese torpedo tactics.
The Japanese actually spotted the Americans visually a minute before American radar returned the favor, but the Japanese were unsure of their sighting for another several minutes. As luck would have it, their course and speed were such that they stood a good chance of crossing the American 'T'. However, the Japanese commander then engaged his squadron in a complex series of evolutions which wasted the intial advantage. At 2256, both columns opened up on each other simultaneously.
The Americans lost one ship (Chevalier) crippled almost immediately to a torpedo, and the next destroyer in line (O'Bannon) then proceeded to ram her sister. However, American gunfire was simultaneously tearing Yugumo apart. Shellfire and a torpedo smashed YUGUMO's bow and left her dead in the water and sinking fast. After a brief exchange of further gunnery between Selfridge, Shigure and Samidare, the Japanese retreated the way the came, apparently fearing larger American forces were approaching the area. The Japanese barges, however, accomplished their mission and rescued all the remaining Japanese troops on the island. All in all, not an impressive showing for the Americans, who should have waited to join forces before attacking the Japanese.
Fortunately for the Americans, the Japanese force was a 'pick-up' team which hadn't practiced together, and Omori tried playing a game that was a little over his head. Confused by conflicting reports he was receiving from his scout planes as to the composition of the American force to his south, he executed a series of 180-degree turns (in pitch blackness) which were designed to give his aircraft more time to bring him information. Instead, all they did was throw his squadron into disarray, leaving his screening force far out of position, just as the Americans arrived on the scene. The Americans, coming upon the Japanese screen, launched torpedoes first, and then opened with guns. The Japanese screening force, upon spotting American destroyers, tried desperately to evade the torps they knew to be in the water, and ended up either colliding with each other or suffering near-misses. Sendai nearly hit Shigure, and Samidare sideswiped Shiratsuyu, slamming her port bow into her comrade's starboard beam staving in her hull and putting her out of the fight. Sendai was then buried in 6-inch gunfire.
Omori tried bringing his main bodyinto the battle. This only succeeded in causing further collisions, as Myoko hit at right angles and tore Hatsukaze's bow off, and Haguro nearly hit two other destroyers. A brief, inconclusive fight followed between the two Japanese heavies and the four American lights. Although the Japanese launched a large salvo of torpedoes, they were ineffective. The Americans achieved several gunfire straddles, but failed to hit their targets. At 0229 Omori ordered a general withdrawal. The Americans found the hapless Hatsukaze (Myoko was still wearing her bow when she returned to Rabaul) and sank her with gunfire. SENDAI foundered before the pursuing Americans could return to her to do the same.
The Japanese had clearly lost this fight, failing to bring their heavy units to bear conclusively, and wiping out most of their own screening destroyers through their own ill-considered maneuvers. The invasion of Bougainville wouldn't be stopped this night.
However, with the invasion of Bougainville, Rabaul was now directly jeopardized for the first time. Because the Battle of Empress August Bay had not turned out to Japan's advantage, she needed to act quickly to stomp out this threat. The Navy therefore reacted to reinforce Rabaul and prepare a counterstroke against the Bougainville invasion by moving a variety of additional cruisers to Rabaul. This was potentially very bad news for the Americans, because they had barely come away from the battle on the 2nd with a margin of victory. Against the forces now massing at Rabaul, there would be little chance of the American light surface units in the neighborhood of Bougainville prevailing. Furthermore, most of the US battleships and cruisers were elsewhere preparing for the invasion of Tarawa. In order to pre-empt a move by the Japanese, Rear-Admiral Frederick Sherman put together a bold operational plan to attack the Japanese force at its base. Racing in under a weather front with two carriers, Sherman relied on land-based airpower from New Guinea to protect his ships, while launching every one of his own planes to attack Rabaul. His sagacity was rewarded by near-total surprise and clear weather over the target.
Simpson's Harbor was crowded with ships, and most of them were refueling and in no way prepared to get underway. As they frantically cast off and scrambled for the harbor entrance, American aircraft had a field day. While no Japanese ships were sunk, many were damaged and would have to be sent back to Japan for months of repair work. Fewer than a dozen attacking aircraft were shot down. Upon recovering their aircraft, Sherman's raiders then raced away southward towards friendly air cover. The Japanese were unable to locate them before they escaped. Any Japanese hopes of contesting the Bougainville landings had vanished.
No one realized it at the time, but Rabaul was essentially finished as a prime naval base for the Japanese. Land-based airpower would now keep it under constant air attack, and its own air groups would be steadily depleted. As time passed, Rabaul would become a backwater, it's garrison of nearly 100,000 men left to 'wither on the vine,' its large group of skilled aircraft mechanics left with less and less to do.
American radar spotted the Japanese first, allowing the Americans to close and launch torpedoes without being initially detected. Both of the Japanese screening destroyers were hit, sinking one (Onami) and crippling the other (Makinami). The Americans then closed in on the destroyer-transports, who scattered and ran for it. Yugiri didn't make it, being pounded by several opponents. The crippled Makinami was also sunk. The American forces tried a stern chase of the other two fleeing Japanese destroyers, but were unable to catch them.
No realized it at the time, but this was the last 'Tokyo Express', and the last surface fight in the Solomons. Freed from screening duties, US destroyers had again held their own against their vaunted Japanese adversaries. There would be no more major naval battles until the invasion of Saipan.
The Americans, by contrast, had now gained the initiative in the entire Pacific theatre. While American ship losses in the Solomons had been severe, they had been more than made up by the prodigious output of its hyperactive shipbuilding programs. The Americans had also done a better job of rescuing their surviving sailors and airmen than their Japanese opponents, meaning that the US Navy was preserving its cadre of veteran combat men. By the end of the Solomons campaign, therefore, the US Navy had not only begun to achieve material superiority, it was also pulling ahead technologically, tactically, and in terms of training. The Americans had now forged the naval power that would hand Japan an unbroken string of defeats until the end of the war.
Links From Related Partner Sites See all photos of Solomon Islands Campaign on WW2DB[UNDER CONSTRUCTION]

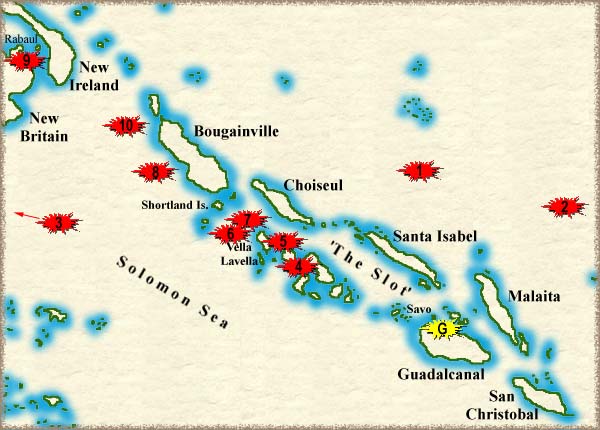
 = Battle
 = Campaign
#2 = Battle of Santa Cruz, October 25-27, 1942
#3 = Battle of the Bismarck Sea, March 3-4, 1943
#4 = Battle of Kula Gulf, July 6, 1943
#5 = Battle of Kolombangara, August 6-7, 1943
#6 = No.1 Transport to Kolombangara, July 31-August 2, 1943
#7 = Battle of Vella Gulf, August 6-7, 1943
#8 = Battle off Horaniu, August 18, 1943
#9 = Battle of Vella Lavella, October 6, 1943
#10 = Battle of Empress Augusta Bay, November 2, 1943
#11 = Carrier Raid on Rabaul, November 5, 1943
#12 = Battle of Cape St. George, November 26, 1943
Aftermath
G = Battles off of Guadalcanal
#######
(August 23-25, 1942)
(October 25-27, 1942)
(March 3-4, 1943)
(July 6, 1943)
(July 12, 1943)
(July 31 - August 2, 1943)
First Transport Run to Kolombangara [31 July - 2 August 1943]
- To reinforce the garrsion on Kolombangara it was resolved to transport supplies by a `Tokyo Express' style transport run of IJN destroyers carrying troops out of Buin, Bougainville. For the mssion was assigned the following:
Transport Unit: Desdiv 4 (HAGIKAZE and ARASHI), and Desdiv 27 (SHIGURE)
Cover Guard Unit: Desdiv 11 (AMAGIRI) carrying the flag of Comdesdiv 11 Captain Yamashiro Matsuhiro.
- At 0545 31 July the Transport Unit departed Rabaul and arrived at Buin at 2300 that afternoon. There the 901 troops and 53 tons of supplies were embarked. At 0100 1 August the embarkation completed, they departed for Kolombangara. Because of last minutes repairs, AMAGIRI did not depart Rabaul till midnight of 31 July and had to proceed in such a way as to catch up with the Transport Unit. This was done and the flagship redenzvoused with the others northwest of Bougainville as they made a feint as planned. Then all proceeded south heading through Vella Gulf for the west shore of Kolombangara Island.
- At 2200 With no further sign of the enemy, the order was given for all to proceed to their assigned stations: AMAGIRI to its 10 km long west-east patrol line to guard the landing site; the Transport Unit ships to Vila to disembark the cargo by barges. Disembarkation was to begin at 2330. So efficiently did the disembarkation proceed and the Japanese Army barges offload the supplies, that Captain Hara recalled it took 20 minutes. Comdesdiv 11 Captain Yamashrio did not put it quite so fast, but confirmed that the unloading was completed ahead of schedule. The AMAGIRI had only just completed two round circuits of patrol when was surprised to see the Transport Unit heading back west and kicked up speed to join them.
- At 0024 now August 2, while departing, AMAGIRI encountered and collided with PT-109 and sank it.[Comdesdiv 11 radioed shortly after it was an accident, and post-war insisted tried to avoid collision. This is very reasonable. There was rational fear of AMAGIRI's bow being blown off by explosion of the PT's torpedoes or other damage that might render vulnerable to air attack] Damage was sufficient to cut speed to 28 knots to avoid vibration but all then withdrew from the battlefield safely. They returned to Rabaul on the afternoon of 2 August, the mission judged a complete success.
(August 6-7, 1943)
(August 18, 1943)
(October 6, 1943)
(November 2, 1943)
(November 5, 1943)
(November 26, 1943)
Kaiyo_wreck
WW2DB article on Solomon Islands Campaign

